FoodPilot
Complete multi-platform restaurant management system. Includes Laravel admin API, Next.js customer web app, and Flutter customer & delivery apps for Android & iOS.
Introduction
FoodPilot is a complete multi-platform restaurant management system consisting of four interconnected applications:
Admin Panel
Laravel backend API + admin dashboard for restaurant owners and managers.
Customer Web App
Next.js web application for customers to browse menus and place orders.
Customer Mobile App
Flutter app for Android & iOS — full ordering experience for customers.
Delivery App
Flutter app for delivery drivers to accept, navigate, and fulfill orders.
All four apps communicate through the Laravel REST API. Follow this documentation to install and configure each component in the correct order.
System Architecture
All platforms connect to one Laravel REST API. Install the API first before configuring the web or mobile apps.
Admin Panel + Backend
What's Included
- ✓ Laravel API + admin panel source code
- ✓ Next.js customer web app
- ✓ Flutter customer app (Android + iOS)
- ✓ Flutter delivery app (Android + iOS)
- ✓ Postman API collection
- ✓ Documentation
Tech Stack
- • PHP 8.3+ / Laravel 12
- • Node.js 18+ / Next.js 16
- • Flutter 3.x / Dart
- • MySQL 5.7+ / MariaDB
Payment Gateway Settings
Configure PayPal, Paymob, Stripe, and Razorpay credentials from the admin panel. Go to Settings → Payment Settings → Payment Gateway Settings, choose the gateway tab, enter the credentials, then save the settings.
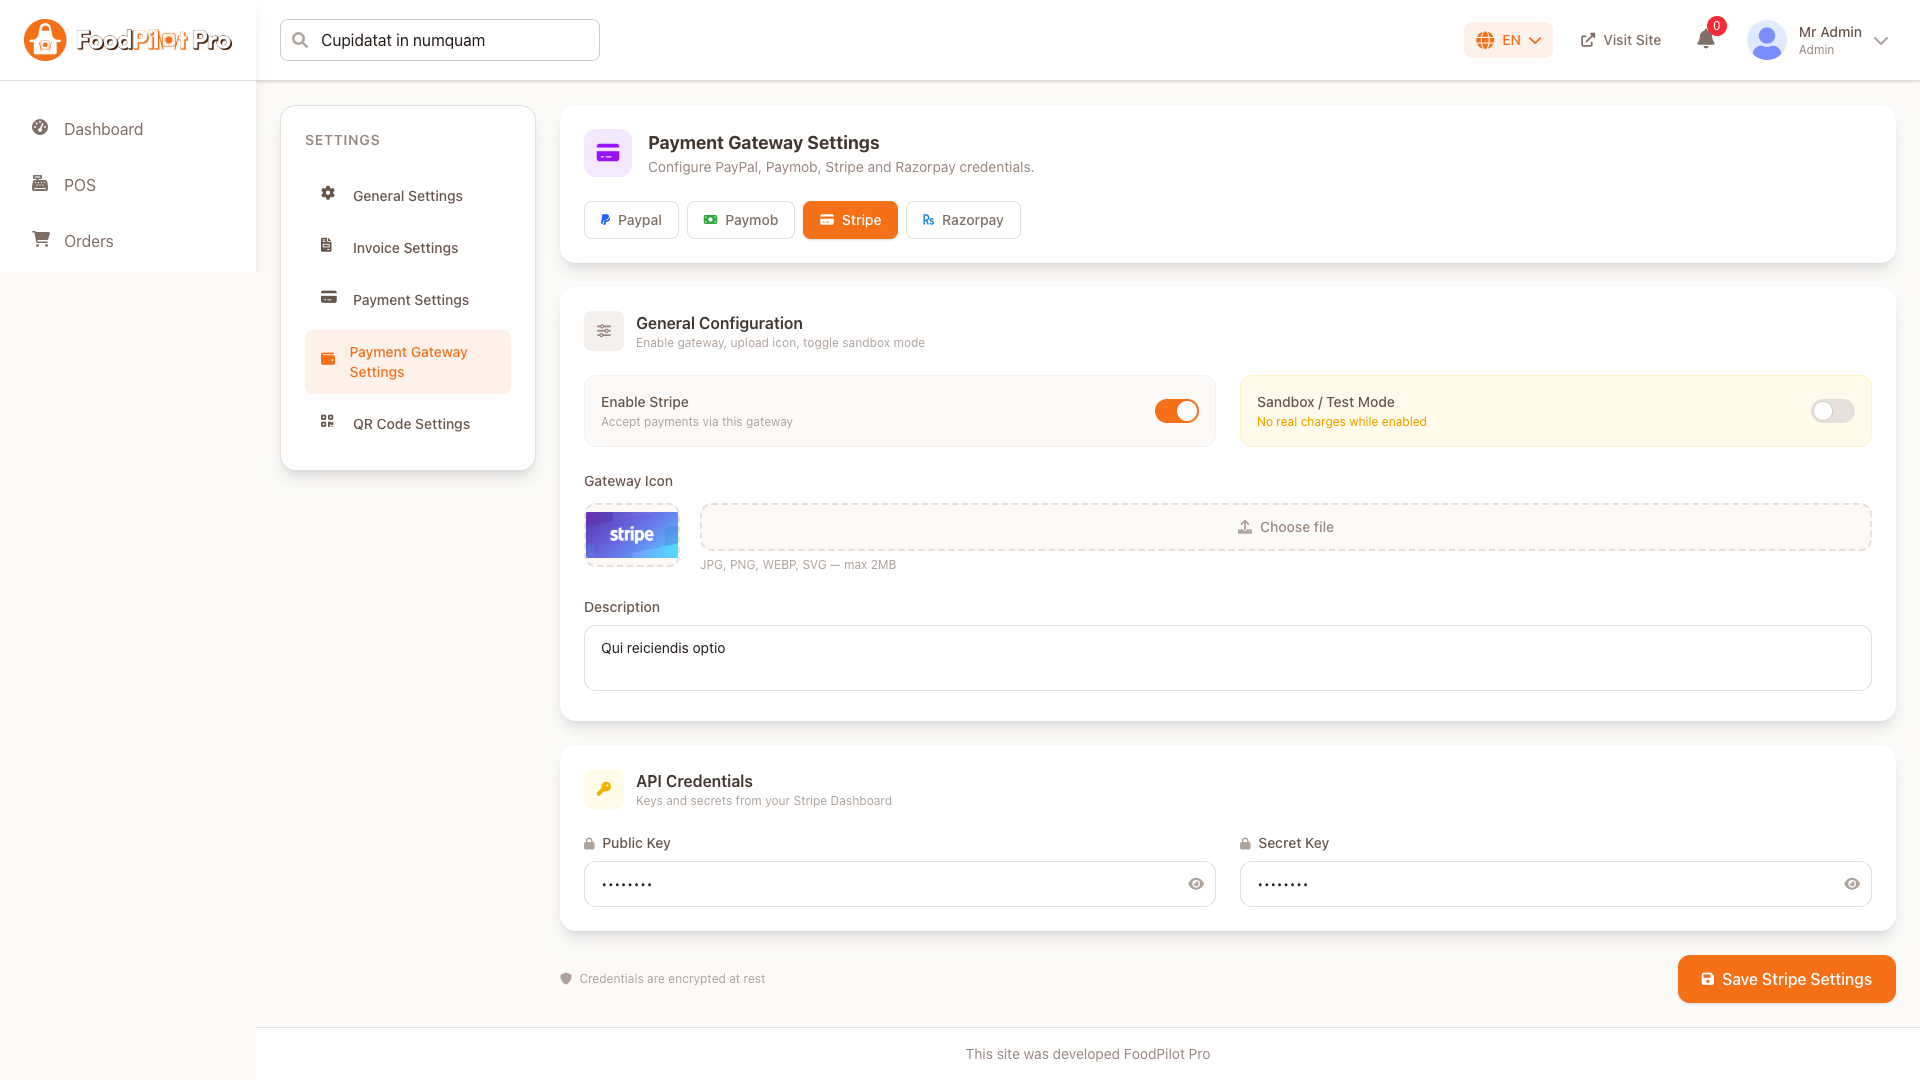
General Configuration
- • Enable the gateway to make it available at checkout.
- • Turn on Sandbox / Test Mode while testing. No real charges are created while sandbox mode is enabled.
- • Upload a gateway icon in JPG, PNG, WEBP, or SVG format. Maximum file size: 2MB.
- • Add a customer-facing description that explains how the payment method works.
API Credentials
Copy keys and secrets from each provider dashboard. Gateway credentials are encrypted at rest after saving.
Use test keys for verification.
Use live keys before accepting real orders.
PayPal
Enable PayPal and enter sandbox plus live application credentials.
If your currency is not available in PayPal, FoodPilot converts your currency value to USD using your configured exchange rate.
Sandbox / Test
- Client ID: PayPal sandbox client ID
- Client Secret: PayPal sandbox client secret
- App ID: PayPal sandbox merchant app ID
Live / Production
- Client ID: PayPal live client ID
- Client Secret: PayPal live client secret
- App ID: PayPal live app ID
Paymob
Accept card and wallet payments through Paymob.
Paymob charges the order amount in your configured currency. Enter both test and production credentials before switching to live mode.
Sandbox / Test
- API Key
- Secret Key
- Public Key
- Integration ID
- Iframe ID
Live / Production
- API Key
- Secret Key
- Public Key
- Integration ID
- Iframe ID
Common
- HMAC Secret
Stripe
Enable Stripe and enter keys from your Stripe Dashboard.
Use sandbox mode with Stripe test keys while verifying checkout. Disable sandbox mode and save live keys before processing real payments.
Required Fields
- Public Key
- Secret Key
Description
Add a short description shown to customers at checkout.
Razorpay
Enable Razorpay and enter API credentials from the Razorpay Dashboard.
Required Fields
- API Key
- API Secret
Security
Saved Razorpay credentials are encrypted at rest.
Server Requirements (VPS Configuration)
Minimum recommended specs for running FoodPilot (Laravel API + Next.js frontend + MySQL) on a VPS.
CPU
2 vCPUs minimum. 4 vCPUs recommended for production.
RAM
2 GB minimum. 4 GB recommended.
OS
Ubuntu 22.04 LTS (recommended) or Debian 12.
Important Server Documentation
Follow these notes when the application shows a server error or the client app cannot connect to the API.
500 Internal Server Error — Common Fix
If you see a 500 Internal Server Error, the most common cause is a missing .env file or missing Laravel app key. Run these commands inside your Laravel project directory:
Then update .env with your database credentials before continuing.
CORS Issue Fix — Client App Not Working
If the client app cannot call the API because of a CORS error, set the CORS_ALLOWED_ORIGINS key in your Laravel .env file. You can allow multiple client domains by separating them with commas.
CORS_ALLOWED_ORIGINS=https://yourdomain.com,https://www.yourdomain.com,https://app.yourdomain.comUse this only for trusted frontend domains. After updating the value, clear Laravel config cache if needed: php artisan config:clear.
Cookie Based API Warning
FoodPilot uses cookie based API responses. For cookies to work correctly, the API and client app must use the same main domain with different subdomains. If the API and client are on completely different domains, login, session, cart, checkout, or authenticated requests may not work.
This setup is required so browser cookies can be shared safely across subdomains and the client app can communicate with the API.
Install & Configure Nginx
1. Install Nginx
sudo apt update
sudo apt install -y nginx
sudo systemctl enable nginx
sudo systemctl start nginx
2. Admin Panel virtual host — /etc/nginx/sites-available/admin.yourdomain.com
server {
    listen 80;
    server_name admin.yourdomain.com www.admin.yourdomain.com;
    root /var/www/foodpilot-admin/public;
    index index.php;

    add_header X-Frame-Options "SAMEORIGIN";
    add_header X-Content-Type-Options "nosniff";

    location / {
        try_files $uri $uri/ /index.php?$query_string;
    }

    location ~ \.php$ {
        include snippets/fastcgi-php.conf;
        fastcgi_pass unix:/var/run/php/php8.3-fpm.sock;
    }

    location ~ /\.ht { deny all; }
}
3. Next.js frontend virtual host — /etc/nginx/sites-available/yourdomain.com
server {
    listen 80;
    server_name yourdomain.com www.yourdomain.com;

    location / {
        proxy_pass http://localhost:3000;
        proxy_http_version 1.1;
        proxy_set_header Upgrade $http_upgrade;
        proxy_set_header Connection 'upgrade';
        proxy_set_header Host $host;
        proxy_cache_bypass $http_upgrade;
    }
}
4. Enable sites & reload
sudo ln -s /etc/nginx/sites-available/admin.yourdomain.com /etc/nginx/sites-enabled/
sudo ln -s /etc/nginx/sites-available/yourdomain.com /etc/nginx/sites-enabled/
sudo nginx -t
sudo systemctl reload nginxInstall & Configure MySQL
1. Install MySQL 8
sudo apt install -y mysql-server
sudo systemctl enable mysql
sudo mysql_secure_installation
2. Create database & user
sudo mysql -u root -p

CREATE DATABASE foodpilot CHARACTER SET utf8mb4 COLLATE utf8mb4_unicode_ci;
CREATE USER 'fpuser'@'localhost' IDENTIFIED BY 'StrongPassword!';
GRANT ALL PRIVILEGES ON foodpilot.* TO 'fpuser'@'localhost';
FLUSH PRIVILEGES;
EXIT;
3. Update Laravel .env
DB_CONNECTION=mysql
DB_HOST=127.0.0.1
DB_PORT=3306
DB_DATABASE=foodpilot
DB_USERNAME=fpuser
DB_PASSWORD=StrongPassword!Install PHP 8.3 & Extensions
sudo apt install -y software-properties-common
sudo add-apt-repository ppa:ondrej/php
sudo apt update
sudo apt install -y php8.3 php8.3-fpm php8.3-mysql php8.3-mbstring \
  php8.3-xml php8.3-bcmath php8.3-curl php8.3-zip php8.3-gd php8.3-intl

sudo systemctl enable php8.3-fpm
sudo systemctl start php8.3-fpmphp -v should show PHP 8.3.x
Install Composer
curl -sS https://getcomposer.org/installer | php
sudo mv composer.phar /usr/local/bin/composer
composer --version
Then inside your Laravel directory:
cd /var/www/foodpilot
composer install --optimize-autoloader --no-devInstall Node.js & npm
# Install via NodeSource (Node 20 LTS)
curl -fsSL https://deb.nodesource.com/setup_20.x | sudo -E bash -
sudo apt install -y nodejs

node -v   # v20.x.x
npm -v    # 10.x.x
Then inside your Next.js directory:
cd /var/www/foodpilot-client
npm install
npm run buildConfigure PM2 (Process Manager)
PM2 keeps the Next.js app running in the background and auto-restarts it on crash or reboot.
1. Install PM2 globally
sudo npm install -g pm22. Start Next.js app
cd /var/www/foodpilot-client
pm2 start npm --name "foodpilot-client" -- start
pm2 save
3. Enable startup on reboot
pm2 startup
# Run the command PM2 outputs, then:
pm2 save
Useful PM2 commands
pm2 list                          # show all processes
pm2 logs foodpilot-client      # tail logs
pm2 restart foodpilot-client   # restart
pm2 stop foodpilot-client # stopDomain & DNS Configuration
Point your domain to the VPS IP via your registrar's DNS panel (GoDaddy, Namecheap, Cloudflare, etc.).
| Type | Name / Host | Value | TTL |
|---|---|---|---|
| A | @ | YOUR_VPS_IP | Auto |
| A | www | YOUR_VPS_IP | Auto |
| A | admin | YOUR_VPS_IP | Auto |
dig yourdomain.com or dnschecker.org.
SSL Setup with Certbot (HTTPS)
Use Let's Encrypt via Certbot to get free SSL certificates for all domains.
1. Install Certbot
sudo apt install -y certbot python3-certbot-nginx2. Obtain certificates
# Main domain (Next.js client)
sudo certbot --nginx -d yourdomain.com -d www.yourdomain.com

# Admin panel
sudo certbot --nginx -d admin.yourdomain.com -d www.admin.yourdomain.com
3. Certbot patches Nginx automatically. Verify HTTPS works:
sudo nginx -t && sudo systemctl reload nginx
curl -I https://yourdomain.com
curl -I https://admin.yourdomain.com
4. Auto-renewal (already set up by Certbot, verify with):
sudo certbot renew --dry-run.env → APP_URL=https://admin.yourdomain.com and your Next.js .env → NEXT_PUBLIC_API_URL=https://admin.yourdomain.com/api
Shared Hosting Requirements
Before deploying on shared hosting, confirm your cPanel environment supports the following. Contact your hosting provider if any item is missing.
⚡ Laravel (Admin API)
- ✓ PHP 8.3+ via MultiPHP or PHP Selector
- ✓ MySQL 5.7+ or MariaDB
- ✓ Composer (SSH Terminal)
- ✓ SSH Terminal access (cPanel → Terminal)
- ✓ Addon Domain / Subdomain creation
- ✓ File Manager or FTP access
- ✓ AutoSSL / Let's Encrypt SSL
▲ Next.js (Client App)
- ✓ Option A — Static export (any host)
- ✓ Option B — Node.js App Manager (CloudLinux hosts)
- ✓ Option C — Deploy to Vercel (recommended)
Laravel Setup on cPanel
Deploy the Laravel admin API on shared hosting step by step.
Create a Subdomain & Point to public/
In cPanel → Domains → Subdomains, create admin.yourdomain.com and set its Document Root to the Laravel project's public/ folder:
/home/yourusername/admin.yourdomain.com/public
This ensures only the public/ directory is web-accessible. The rest of the Laravel app stays outside the web root.
Upload Project Files
Upload the Laravel project ZIP via cPanel → File Manager into /home/yourusername/admin.yourdomain.com/, then extract it:
# Via cPanel Terminal (SSH)
cd ~/admin.yourdomain.com
unzip laravel-admin.zip -d .
rm laravel-admin.zip
Alternatively use FTP (FileZilla) to upload all files directly.
Set PHP Version to 8.3
In cPanel → MultiPHP Manager (or PHP Selector), select the subdomain admin.yourdomain.com and set PHP to 8.3.
Also enable these PHP extensions: pdo_mysql, mbstring, xml, curl, zip, gd, bcmath, intl.
Create MySQL Database
Go to cPanel → MySQL Databases:
- Create database:
yourusername_fpAdmin - Create user:
yourusername_fpUserwith a strong password - Add user to database with All Privileges
Configure .env
In cPanel → File Manager, rename .env.example → .env and edit it:
# App
APP_NAME=FoodPilot
APP_ENV=production
APP_DEBUG=false
APP_URL=https://admin.yourdomain.com

# Database
DB_CONNECTION=mysql
DB_HOST=127.0.0.1
DB_PORT=3306
DB_DATABASE=yourusername_fpAdmin
DB_USERNAME=yourusername_fpUser
DB_PASSWORD=StrongPassword!

# Mail
MAIL_MAILER=smtp
MAIL_HOST=mail.yourdomain.com
MAIL_PORT=587
MAIL_USERNAME=no-reply@yourdomain.com
MAIL_PASSWORD=your_email_password
MAIL_FROM_ADDRESS=no-reply@yourdomain.com
Install Composer & Run Artisan
Open cPanel → Terminal and run:
cd ~/admin.yourdomain.com

# Install Composer if not available globally
curl -sS https://getcomposer.org/installer | php
php composer.phar install --optimize-autoloader --no-dev

php artisan key:generate
php artisan migrate --force
php artisan db:seed --force
php artisan storage:link
php artisan config:cache
php artisan route:cache
php artisan optimize
Set Folder Permissions & Enable SSL
chmod -R 755 storage bootstrap/cache
Enable SSL: cPanel → SSL/TLS → AutoSSL (free) or install Let's Encrypt via the SSL/TLS Status panel for admin.yourdomain.com.
Test the Installation
Visit the admin panel in your browser:
Or test the API health endpoint:
curl -I https://admin.yourdomain.com/api/health
Next.js Setup on cPanel
Three deployment options depending on your host's capabilities — choose the one that fits.
Static Export — works on any shared host
No Node.js neededEnable static export in next.config.js:
/** @type {import('next').NextConfig} */
const nextConfig = {
  output: 'export',
  trailingSlash: true,
}
module.exports = nextConfig
Build locally, then upload the generated out/ folder:
npm run build
# Uploads the contents of out/ to your subdomain root via FTP or File Manager
Node.js App Manager — CloudLinux hosts
Full Next.js supportIf your host has Node.js App Manager (Namecheap, A2 Hosting, etc.), create a Node.js app:
- cPanel → Software → Setup Node.js App
- Node.js version: 20.x · Application root:
nextjs-client· Startup file:node_modules/.bin/next - Upload project files to the application root via File Manager
- Click Run NPM Install inside the App Manager UI
- Start the app and note the internal port assigned
# Via cPanel Terminal
cd ~/nextjs-client
npm run build
Set environment variables in the Node.js App Manager panel or create a .env file from .env.example in the app root with:
NEXT_PUBLIC_APP_NAME=FoodPilot
NEXT_PUBLIC_APP_URL=https://yourdomain.com
NEXT_PUBLIC_API_URL=https://admin.yourdomain.com/api
Deploy to Vercel — recommended
Free tier availableKeep your domain on cPanel (for email, Laravel) but deploy Next.js to Vercel — skip Node.js headaches entirely:
npm i -g vercel
vercel login
vercel --prod
Add environment variables in Vercel → Project → Settings → Environment Variables:
NEXT_PUBLIC_APP_NAME=FoodPilot
NEXT_PUBLIC_APP_URL=https://yourdomain.com
NEXT_PUBLIC_API_URL=https://admin.yourdomain.com/api
Then point your domain to Vercel by adding a CNAME record in cPanel → Zone Editor:
| Type | Name | Value |
|---|---|---|
| CNAME | www | cname.vercel-dns.com |
| A | @ | 76.76.21.21 |
Server Requirements
Verify your hosting environment before installation.
PHP & Extensions
- ✓ PHP 8.3 or higher
- ✓ OpenSSL
- ✓ PDO Extension
- ✓ Mbstring Extension
- ✓ Tokenizer Extension
- ✓ XML Extension
- ✓ JSON Extension
- ✓ GD / Imagick
- ✓ Fileinfo Extension
- ✓ CURL Extension
Database & Server
- ✓ MySQL 5.7+ or MariaDB
- ✓ Composer 2.x
- ✓ Apache or Nginx
- ✓ SSL Certificate (HTTPS)
- ✓ 512MB+ RAM
- ✓ SSH or Terminal access
Installation Guide
Deploy the Laravel admin panel on your VPS step by step.
Download from Envato
Log in to your CodeCanyon account → Downloads → FoodPilot → Download All Files & Documentation. Extract the ZIP on your local machine.
Create Admin Subdomain
In your domain registrar / DNS panel, add an A record pointing the subdomain to your VPS IP. If you already did this in the Server Setup section, skip ahead.
| Type | Name | Value |
|---|---|---|
| A | admin | YOUR_VPS_IP |
| A | www.admin | YOUR_VPS_IP |
Upload Project to Server
Choose one of the two methods:
Option A — Git (recommended)
ssh user@YOUR_VPS_IP
sudo mkdir -p /var/www/admin.yourdomain.com
cd /var/www/admin.yourdomain.com
sudo git clone https://github.com/your-repo/foodpilot-admin.git .
sudo chown -R $USER:$USER /var/www/admin.yourdomain.com
Option B — FTP / File Manager
Upload laravel-admin.zip into /var/www/admin.yourdomain.com via your FTP client or File Manager, then extract it:
cd /var/www/admin.yourdomain.com
sudo unzip laravel-admin.zip -d .
sudo rm laravel-admin.zip
Create MySQL Database
Via SSH, connect to MySQL and create a dedicated database and user:
sudo mysql -u root -p

CREATE DATABASE foodpilot_admin CHARACTER SET utf8mb4 COLLATE utf8mb4_unicode_ci;
CREATE USER 'fp_admin'@'localhost' IDENTIFIED BY 'StrongPassword!';
GRANT ALL PRIVILEGES ON foodpilot_admin.* TO 'fp_admin'@'localhost';
FLUSH PRIVILEGES;
EXIT;
Save these credentials — you'll need them in the next step.
Configure .env File
cd /var/www/admin.yourdomain.com
cp .env.example .env
nano .env
Fill in the values below:
# App
APP_NAME=FoodPilot
APP_ENV=production
APP_DEBUG=false
APP_URL=https://admin.yourdomain.com

# Database
DB_CONNECTION=mysql
DB_HOST=127.0.0.1
DB_PORT=3306
DB_DATABASE=foodpilot_admin
DB_USERNAME=fp_admin
DB_PASSWORD=StrongPassword!

# Mail
MAIL_MAILER=smtp
MAIL_HOST=smtp.mailtrap.io
MAIL_PORT=587
MAIL_USERNAME=your_email
MAIL_PASSWORD=your_password
MAIL_FROM_ADDRESS=no-reply@yourdomain.com
Visit the installer URL in your browser and follow the on-screen steps — no SSH required.
Before installing, copy .env.example to .env.
Installer Steps Preview
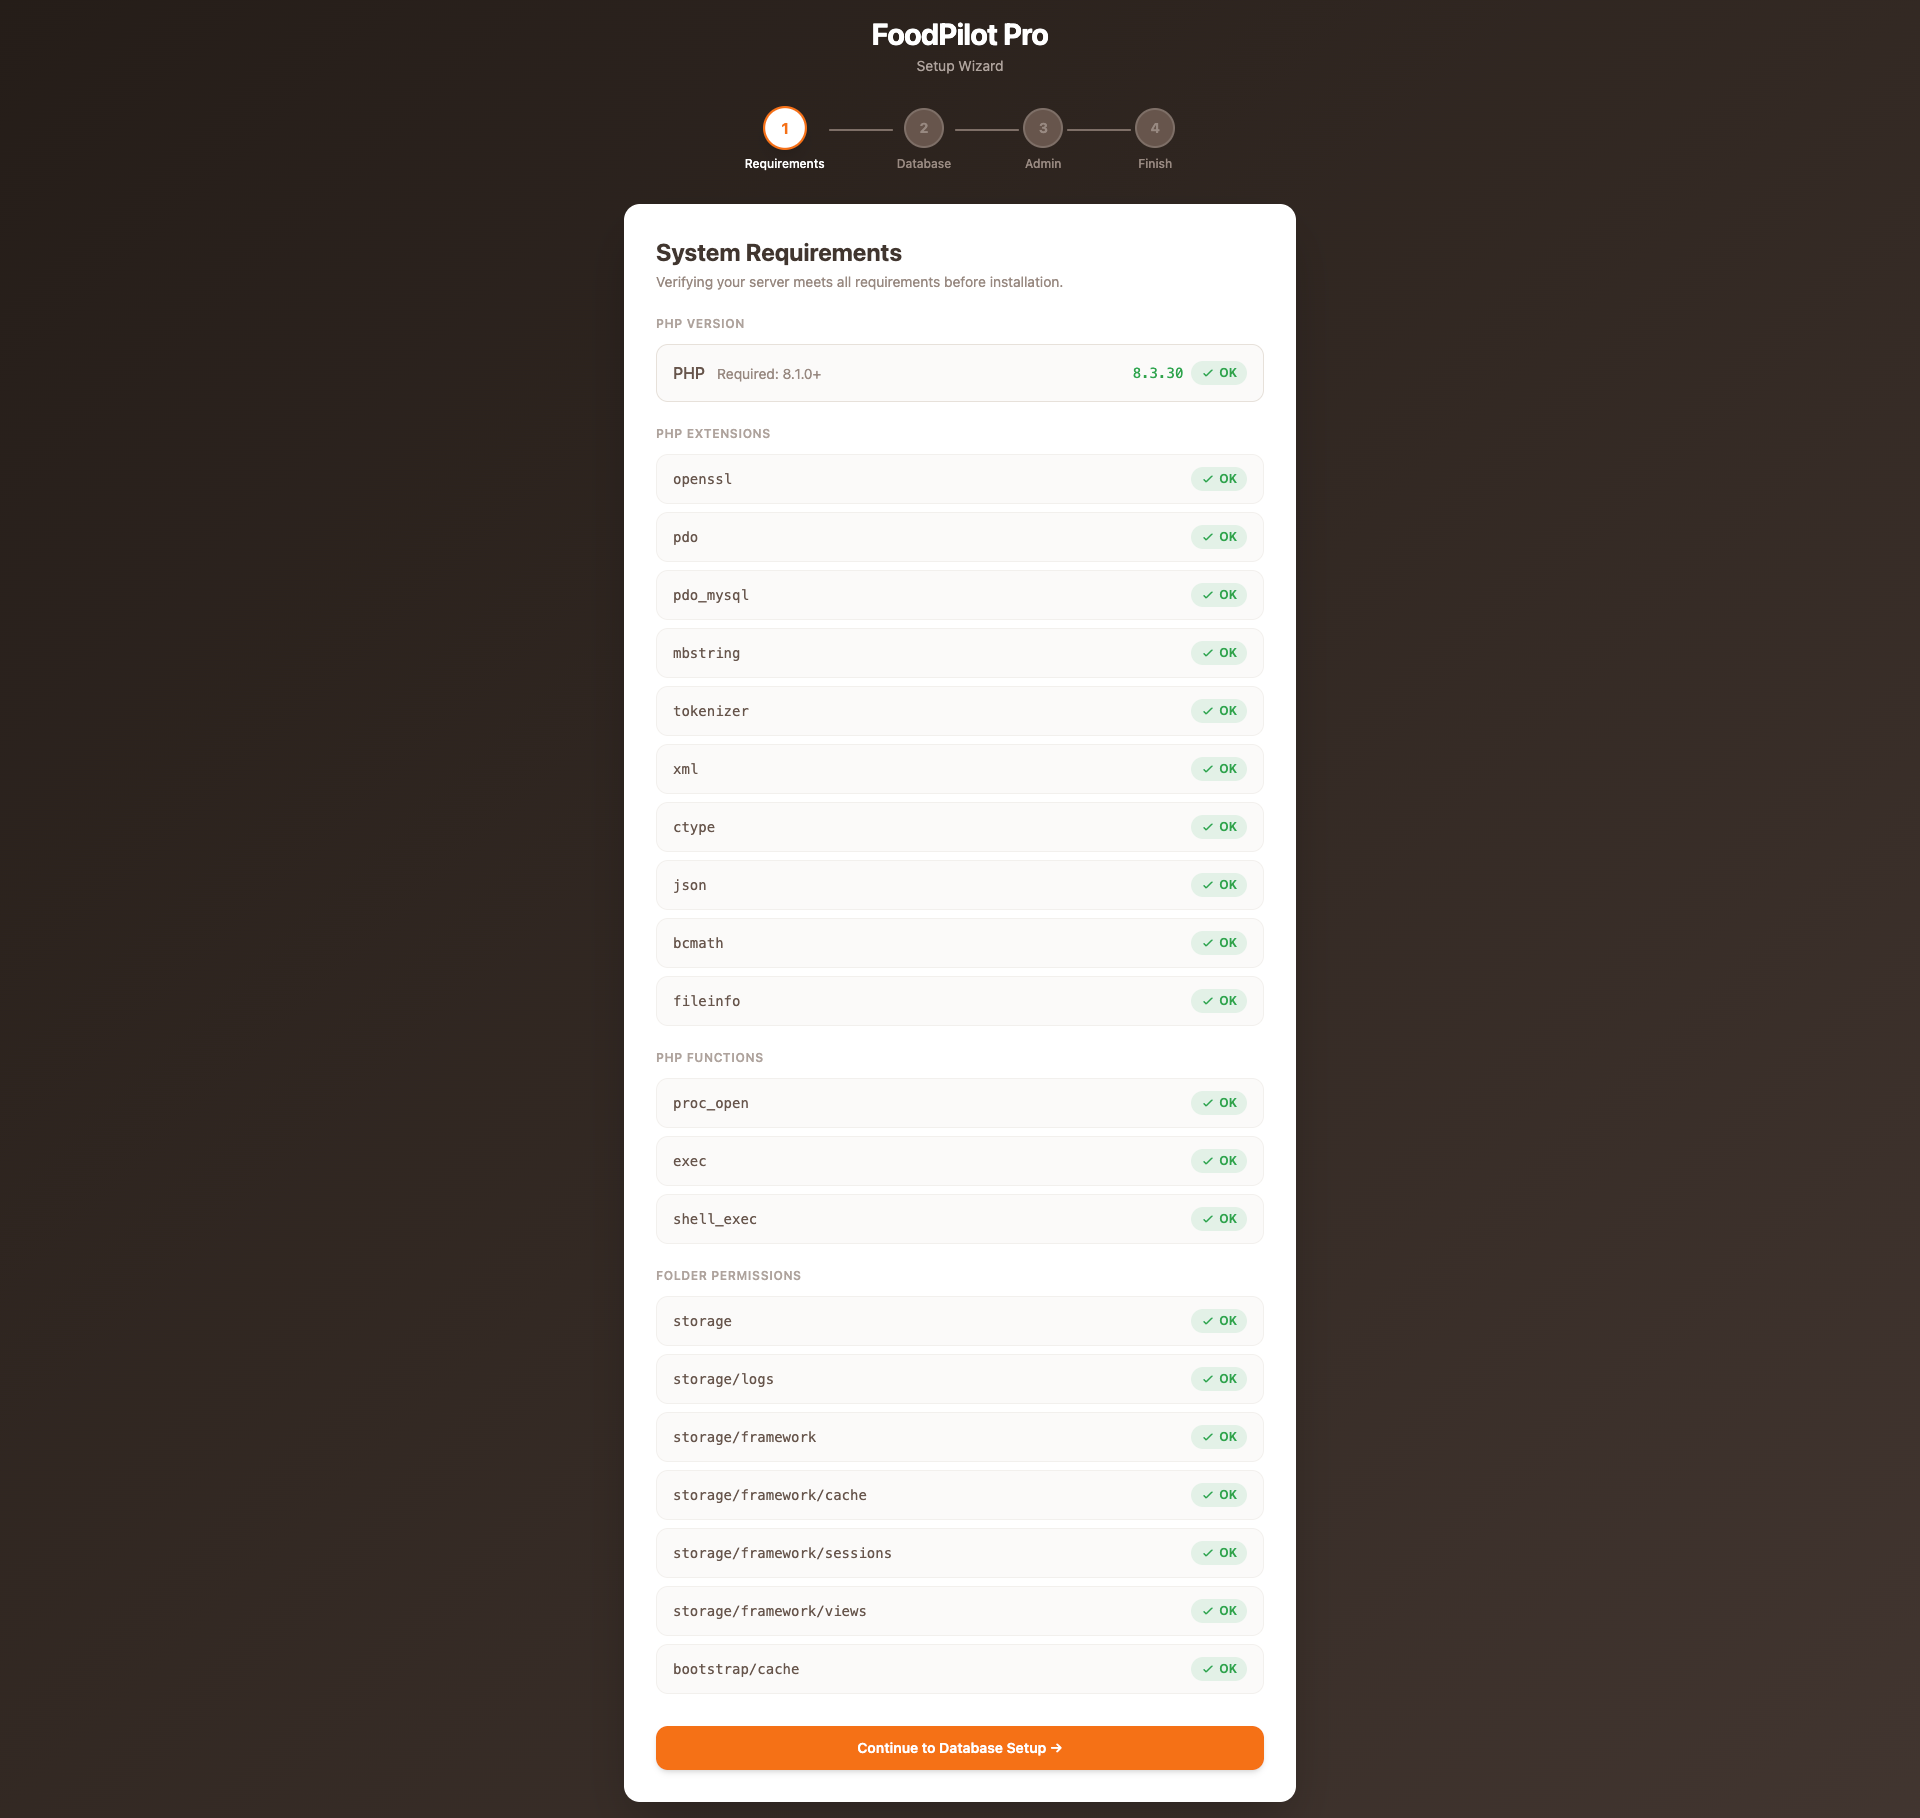
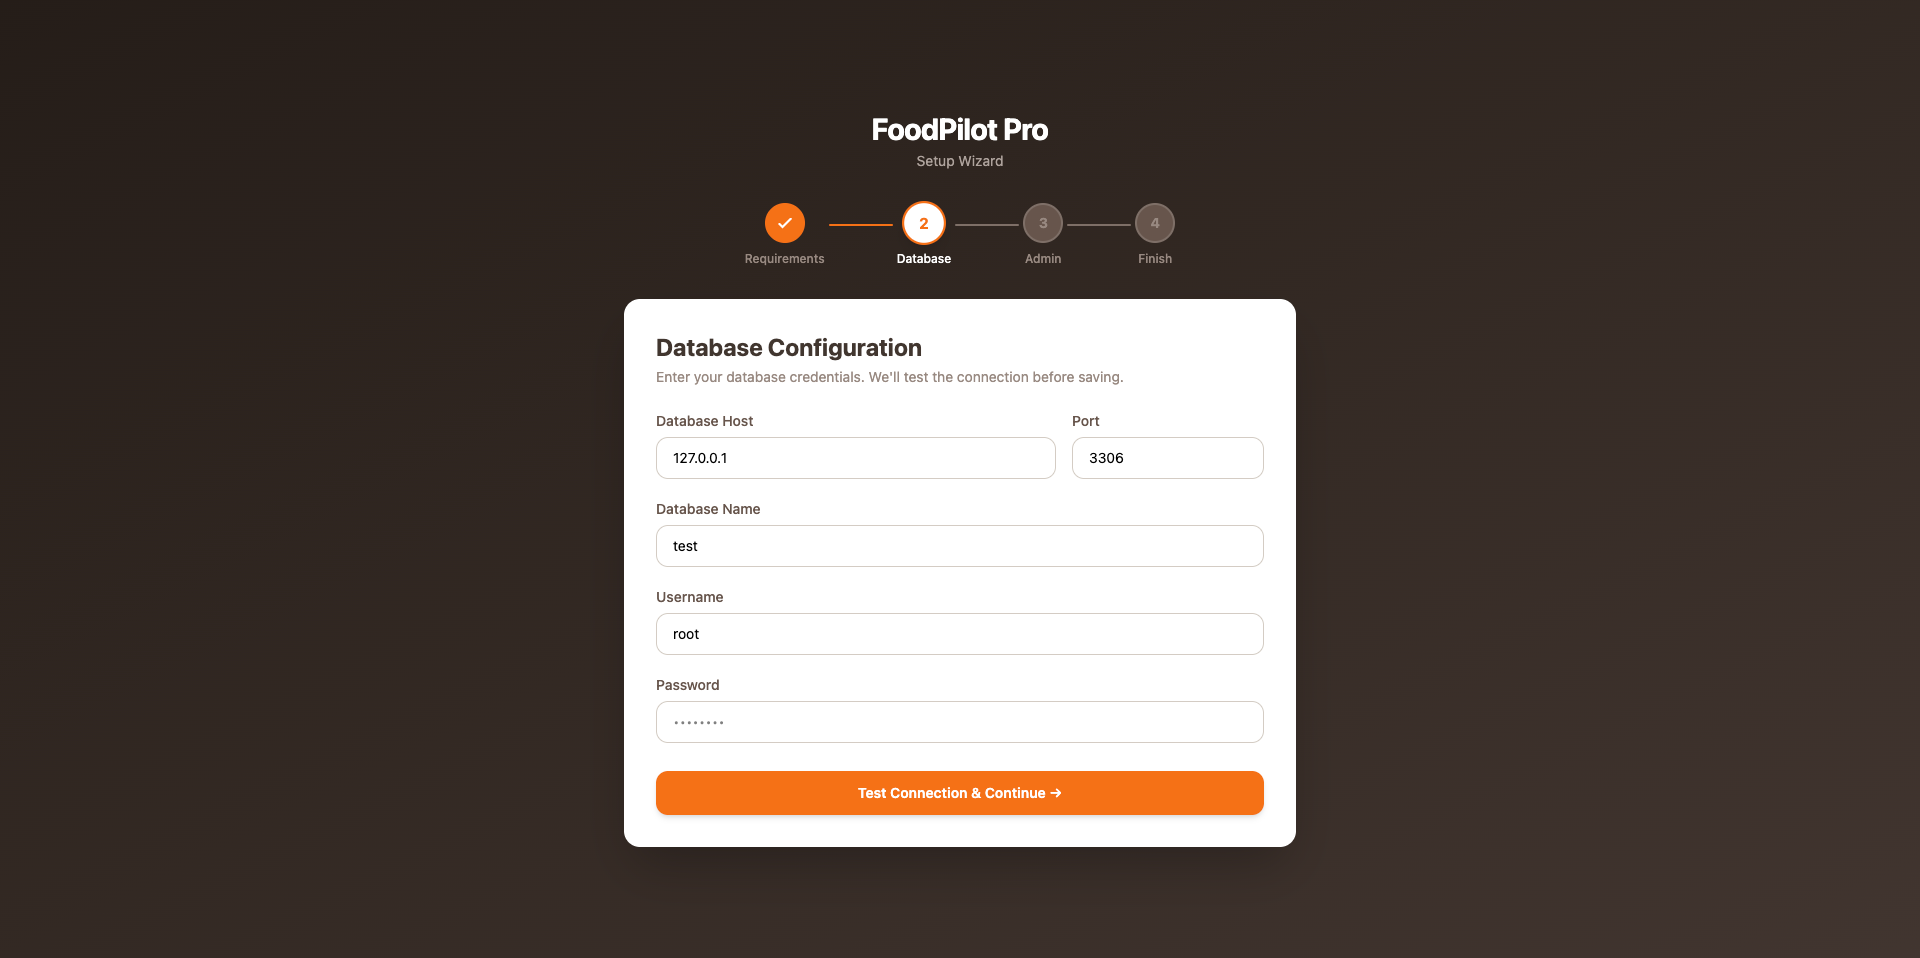
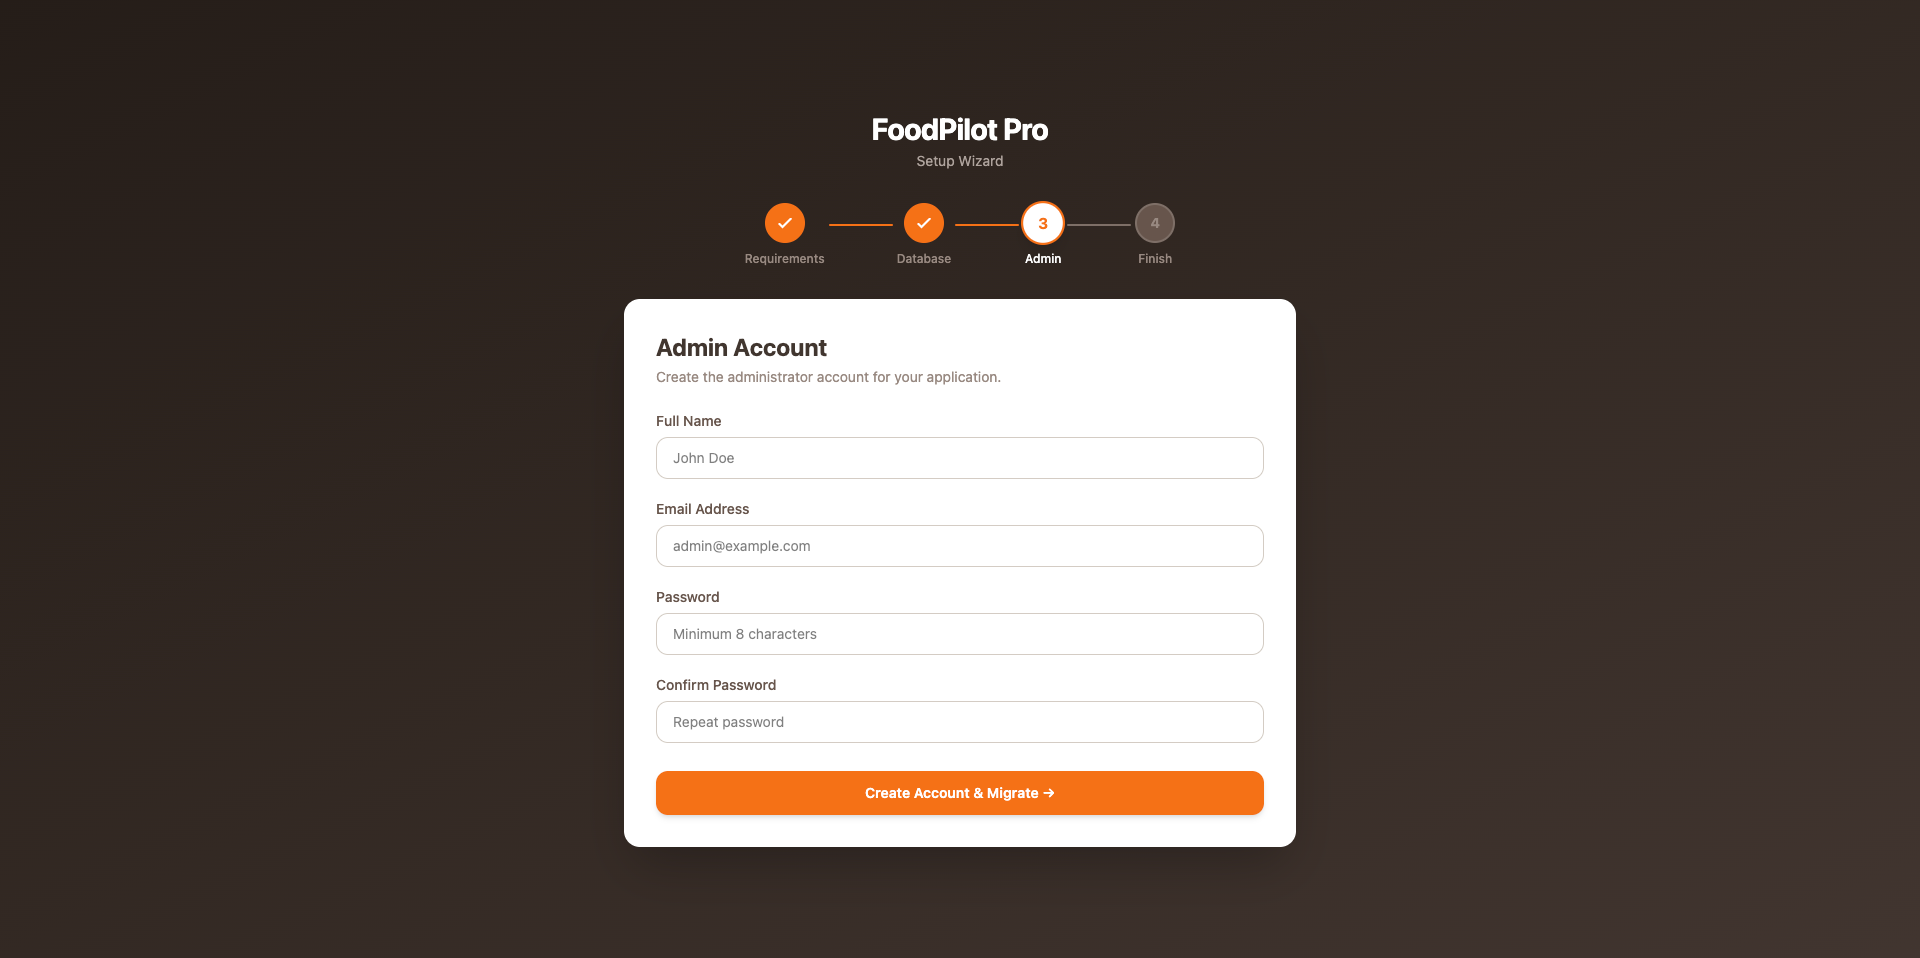
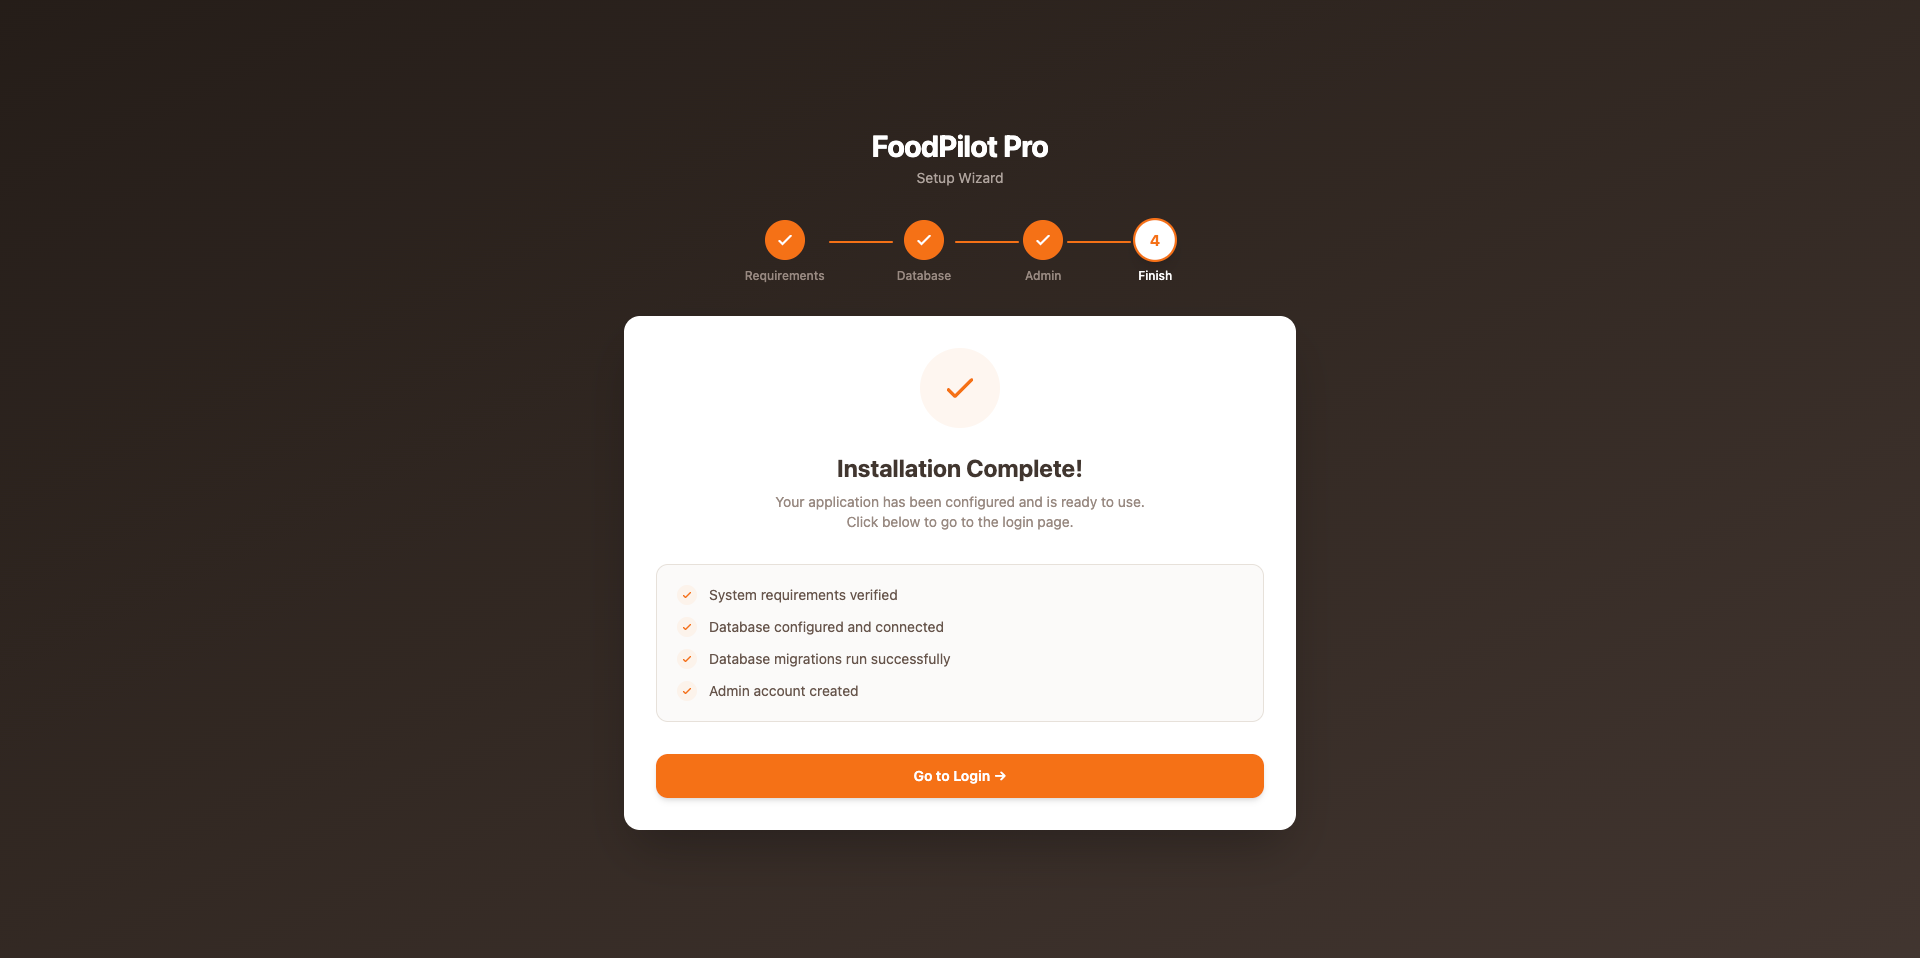
Click any image to enlarge. Place screenshots in image/installer/step1.png … step4.png.
Run Artisan Commands
SSH into your server and run from the project root:
cd /var/www/admin.yourdomain.com

composer install --optimize-autoloader --no-dev
php artisan key:generate
php artisan migrate --force
php artisan db:seed --force
php artisan storage:link
php artisan config:cache
php artisan route:cache
php artisan optimize
Set Folder Permissions
chmod -R 775 storage bootstrap/cache
chown -R www-data:www-data storage bootstrap/cache
Test the Installation
Open your browser and visit the admin panel. You should see the login page.
Or test the API health endpoint — should return 200 OK:
curl -I https://admin.yourdomain.com/api/health
Before going live, verify:
APP_DEBUG=false— prevents exposing stack traces to users- Storage symlink exists:
ls -la public/storage - Folder permissions set correctly on
storage/andbootstrap/cache/ - SSL certificate active — Nginx should redirect HTTP → HTTPS
Admin Panel Features
A complete Laravel-powered back-office to run every aspect of your food delivery business — from live order tracking and menu control to POS terminals, QR-code menus, a kitchen display system, and table reservations.
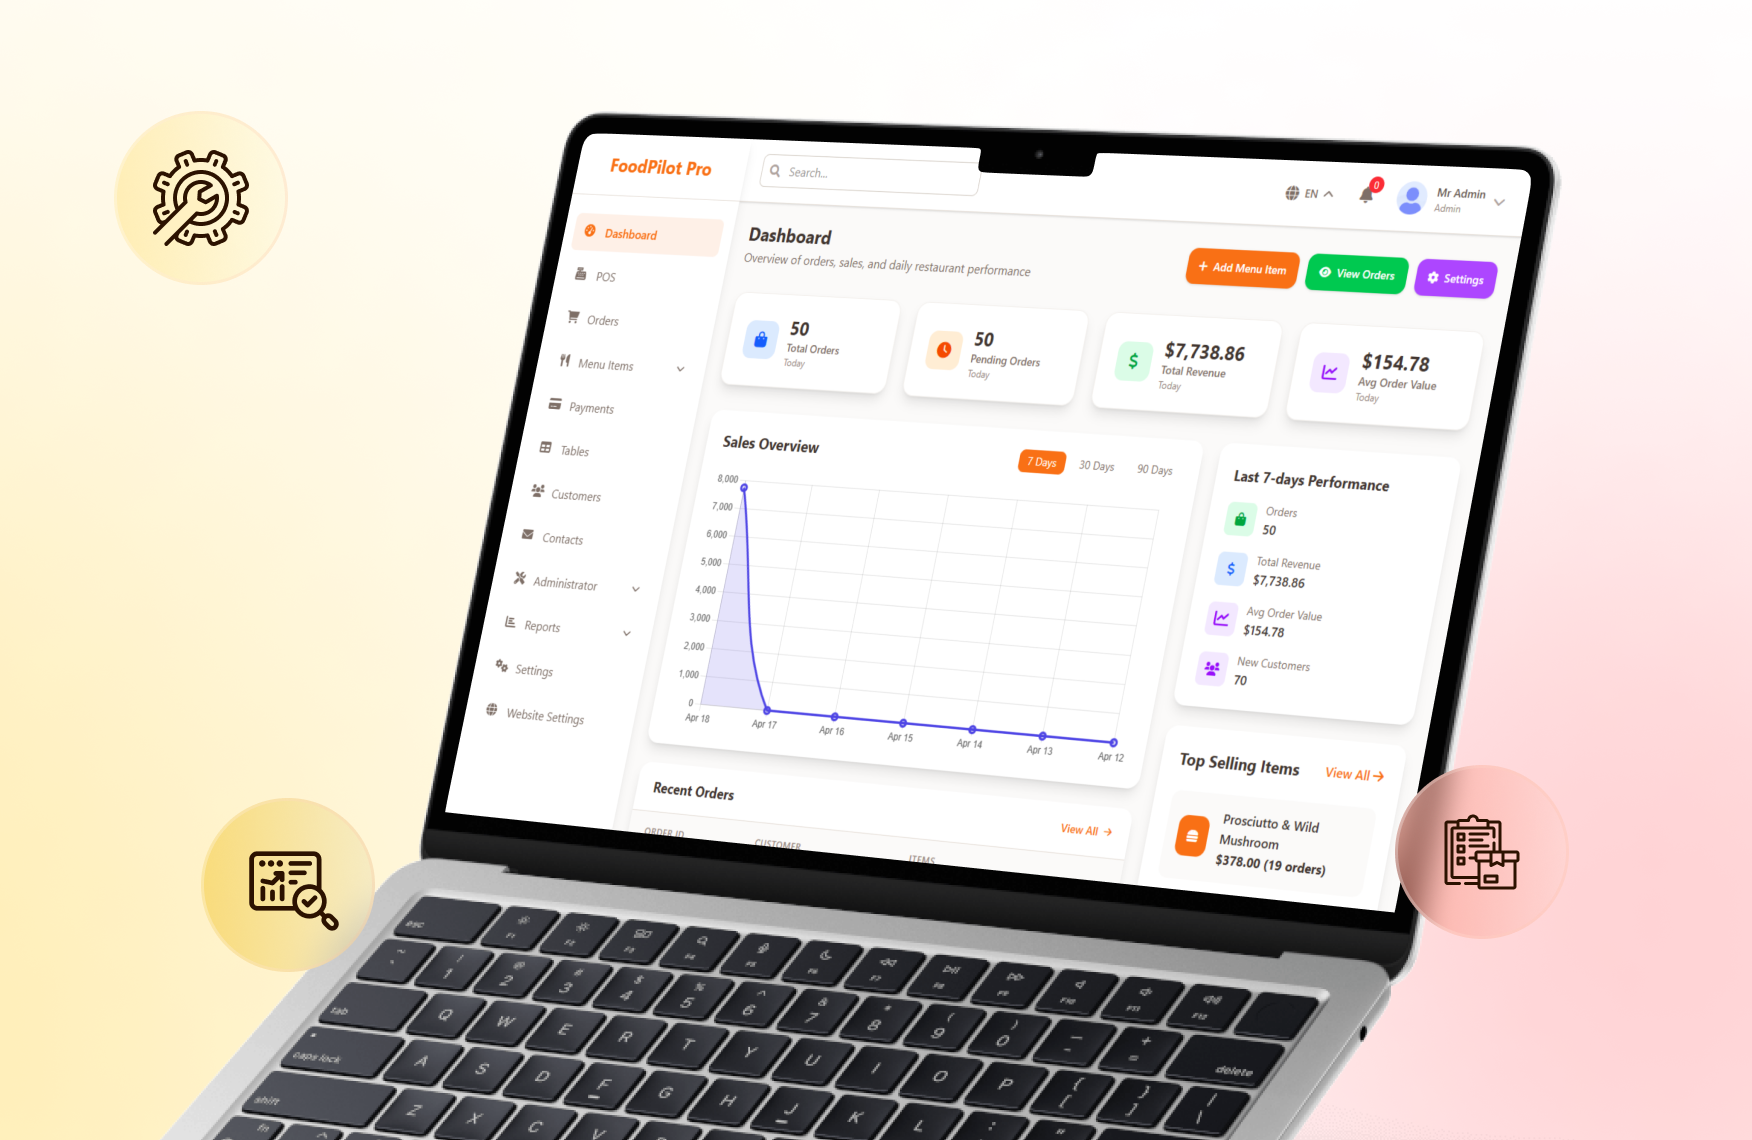
Analytics Dashboard
Real-time bird's-eye view of your restaurant performance — revenue trends, order volumes, and top-selling items all on one screen.
- ✓ Daily, weekly, and monthly revenue charts
- ✓ Total orders count and completion rate
- ✓ Top-selling menu items ranking
- ✓ Live order activity feed
- ✓ New customer growth over time
Detailed Reports & Statistics
Drill down into granular business data with filterable reports and exportable charts to spot trends and make informed decisions.
- ✓ Revenue breakdown by category or branch
- ✓ Hourly sales heatmap
- ✓ Driver performance and delivery time stats
- ✓ Customer retention and repeat-order rate
- ✓ Export reports as CSV or PDF
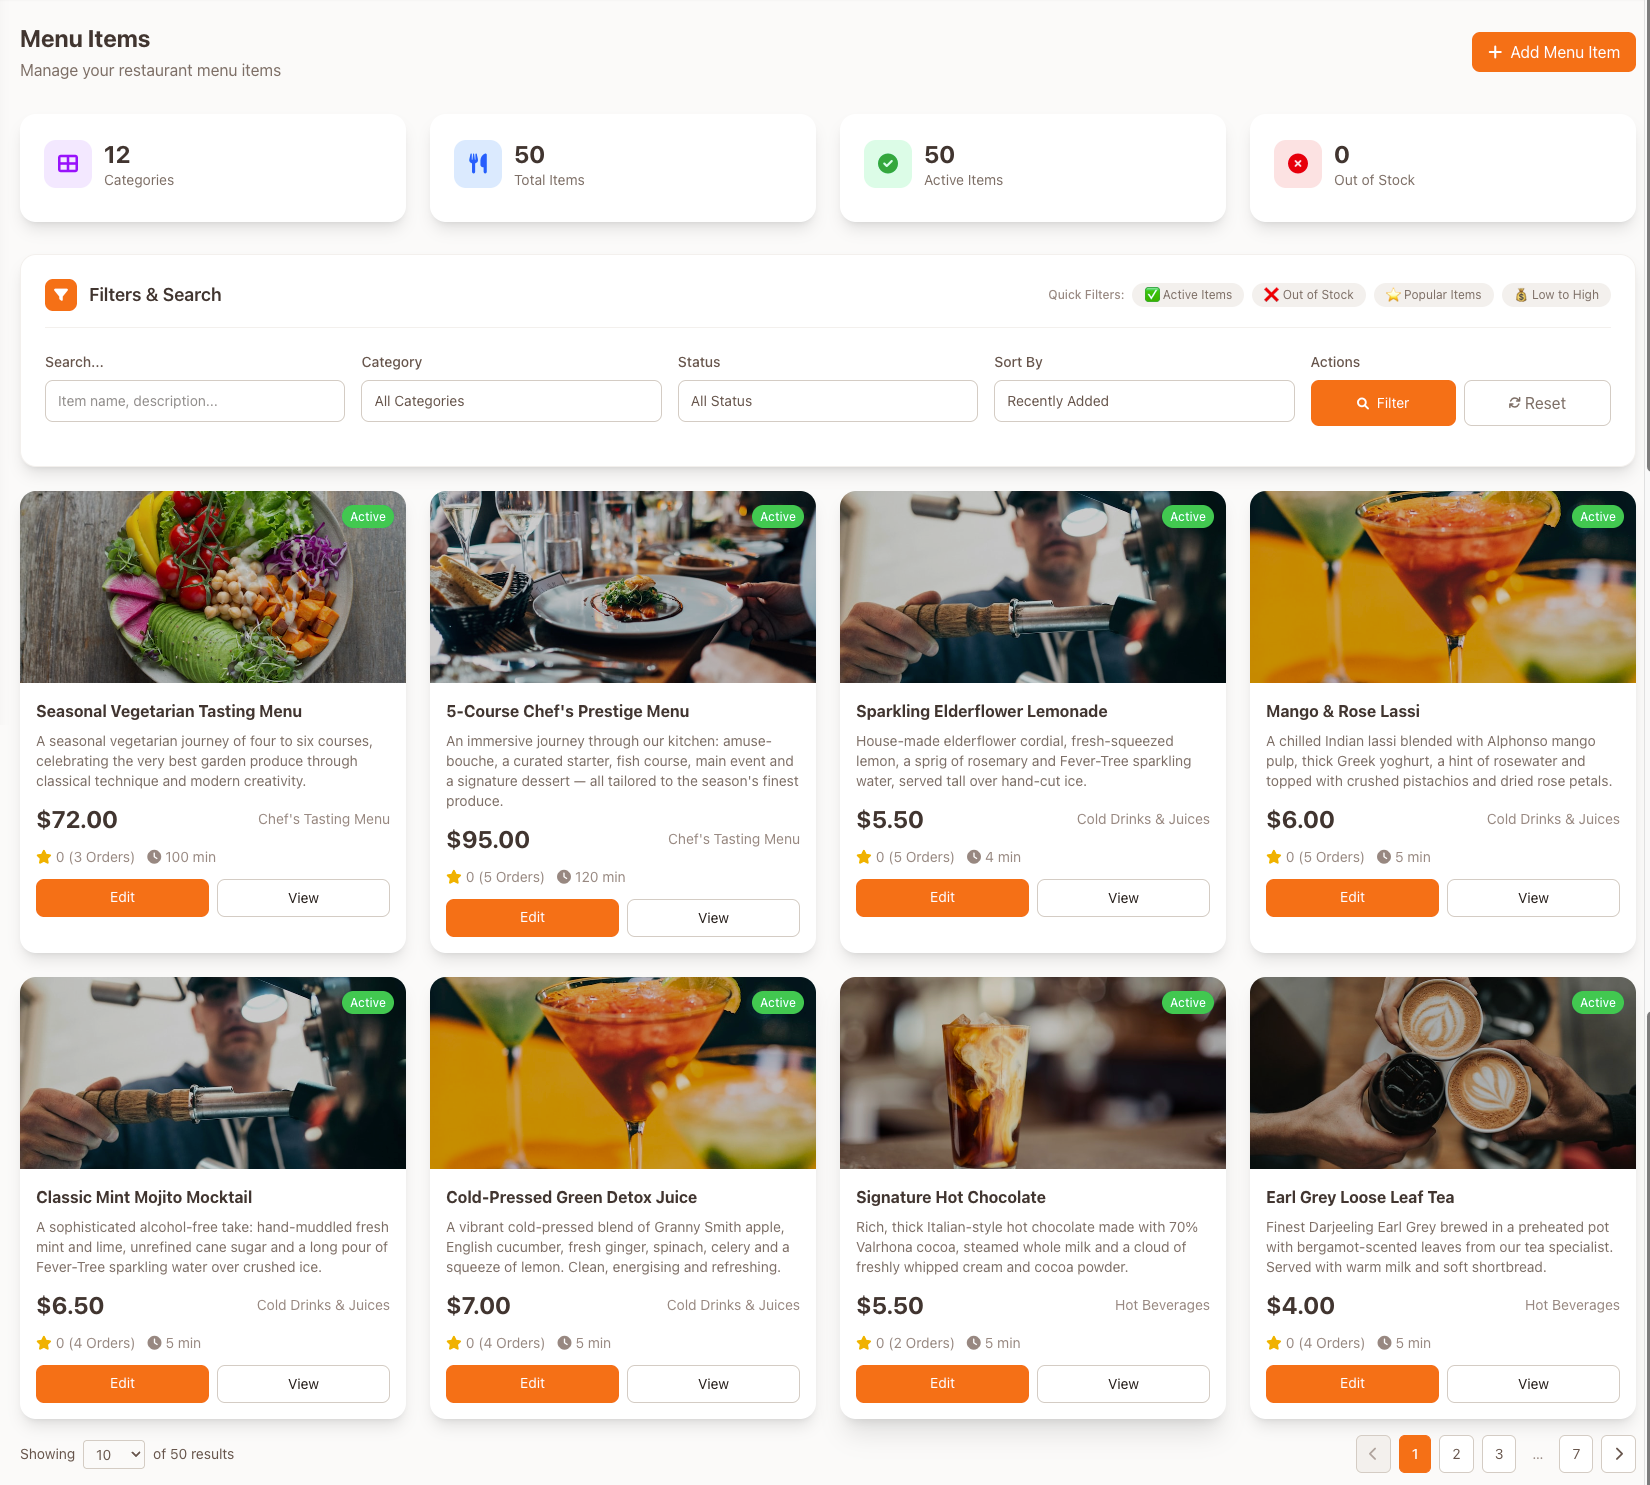
Menu Management
Full control over your food catalog — add rich descriptions, photos, and modifiers, and toggle availability without a page reload.
- ✓ Add/edit items with images and descriptions
- ✓ Organize by categories and subcategories
- ✓ Set prices, discounts, and add-ons
- ✓ Toggle item availability instantly
- ✓ Manage variants and portion sizes
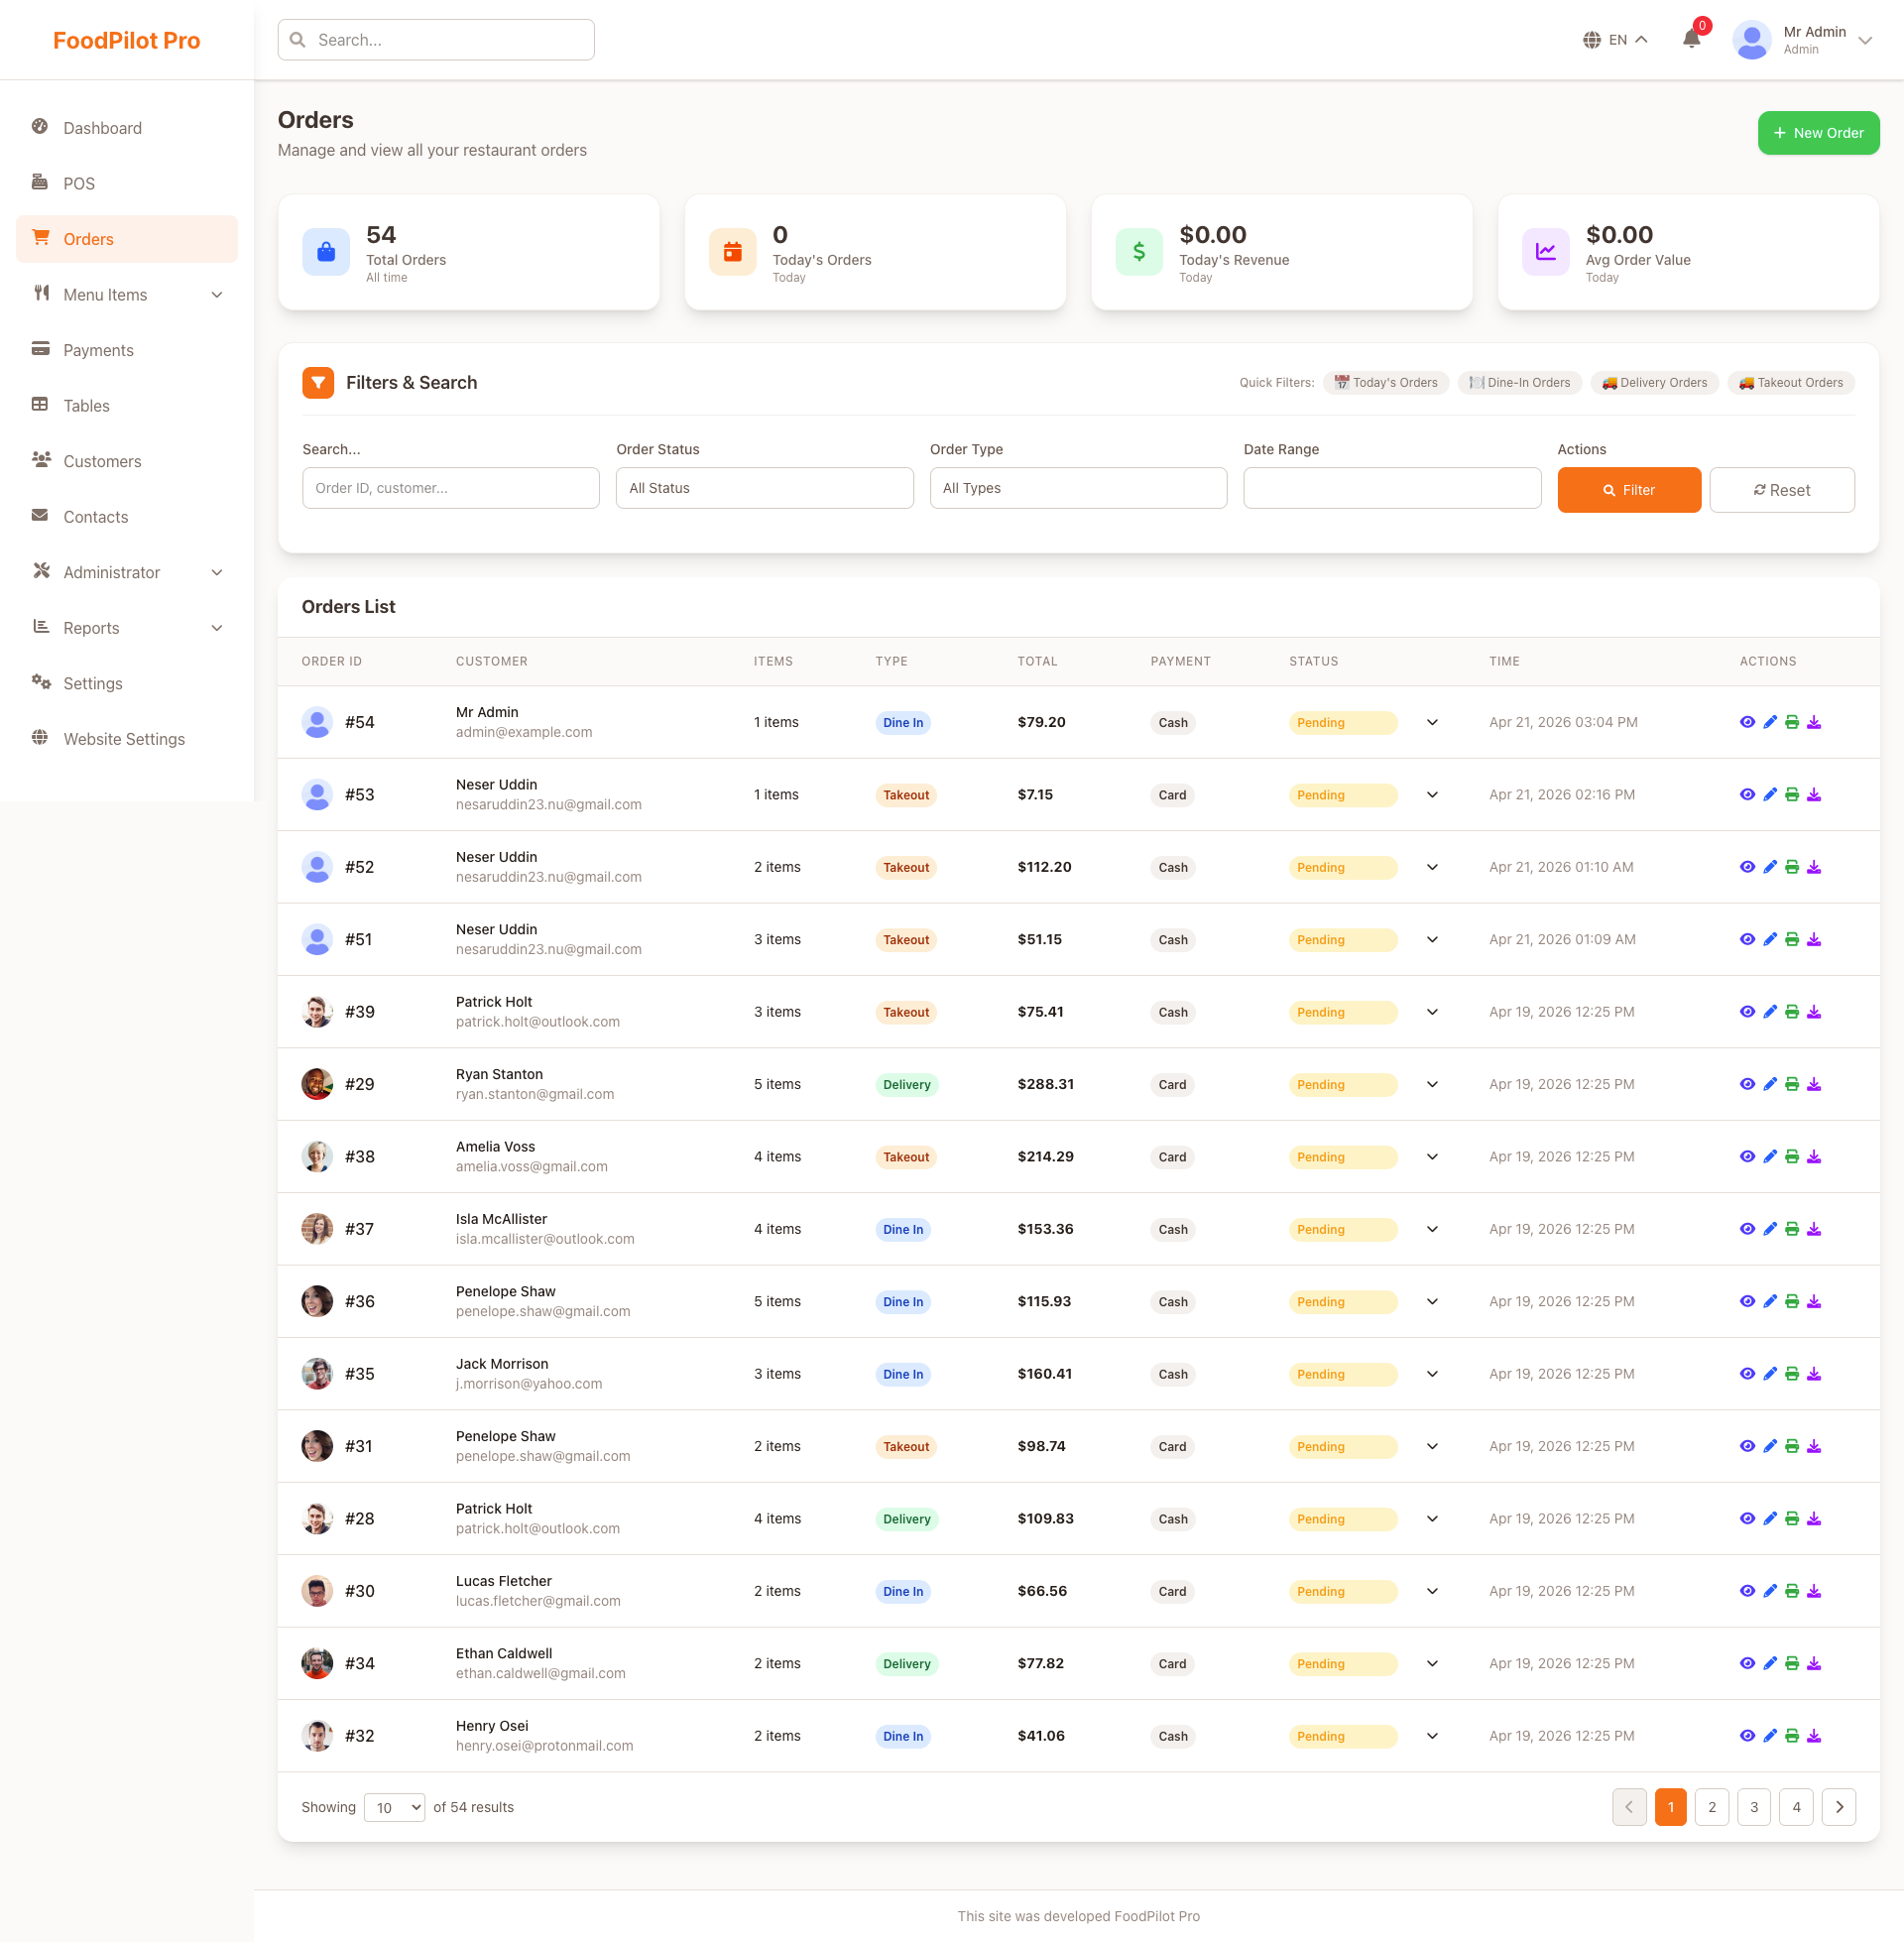
Order Management
Process, track, and manage every order from a single streamlined interface with real-time status updates pushed to customers automatically.
- ✓ Real-time incoming order notifications
- ✓ Status pipeline: pending → confirmed → out for delivery → delivered
- ✓ Assign orders to delivery drivers
- ✓ Itemized order detail and invoice view
- ✓ Filter by status, date range, or branch
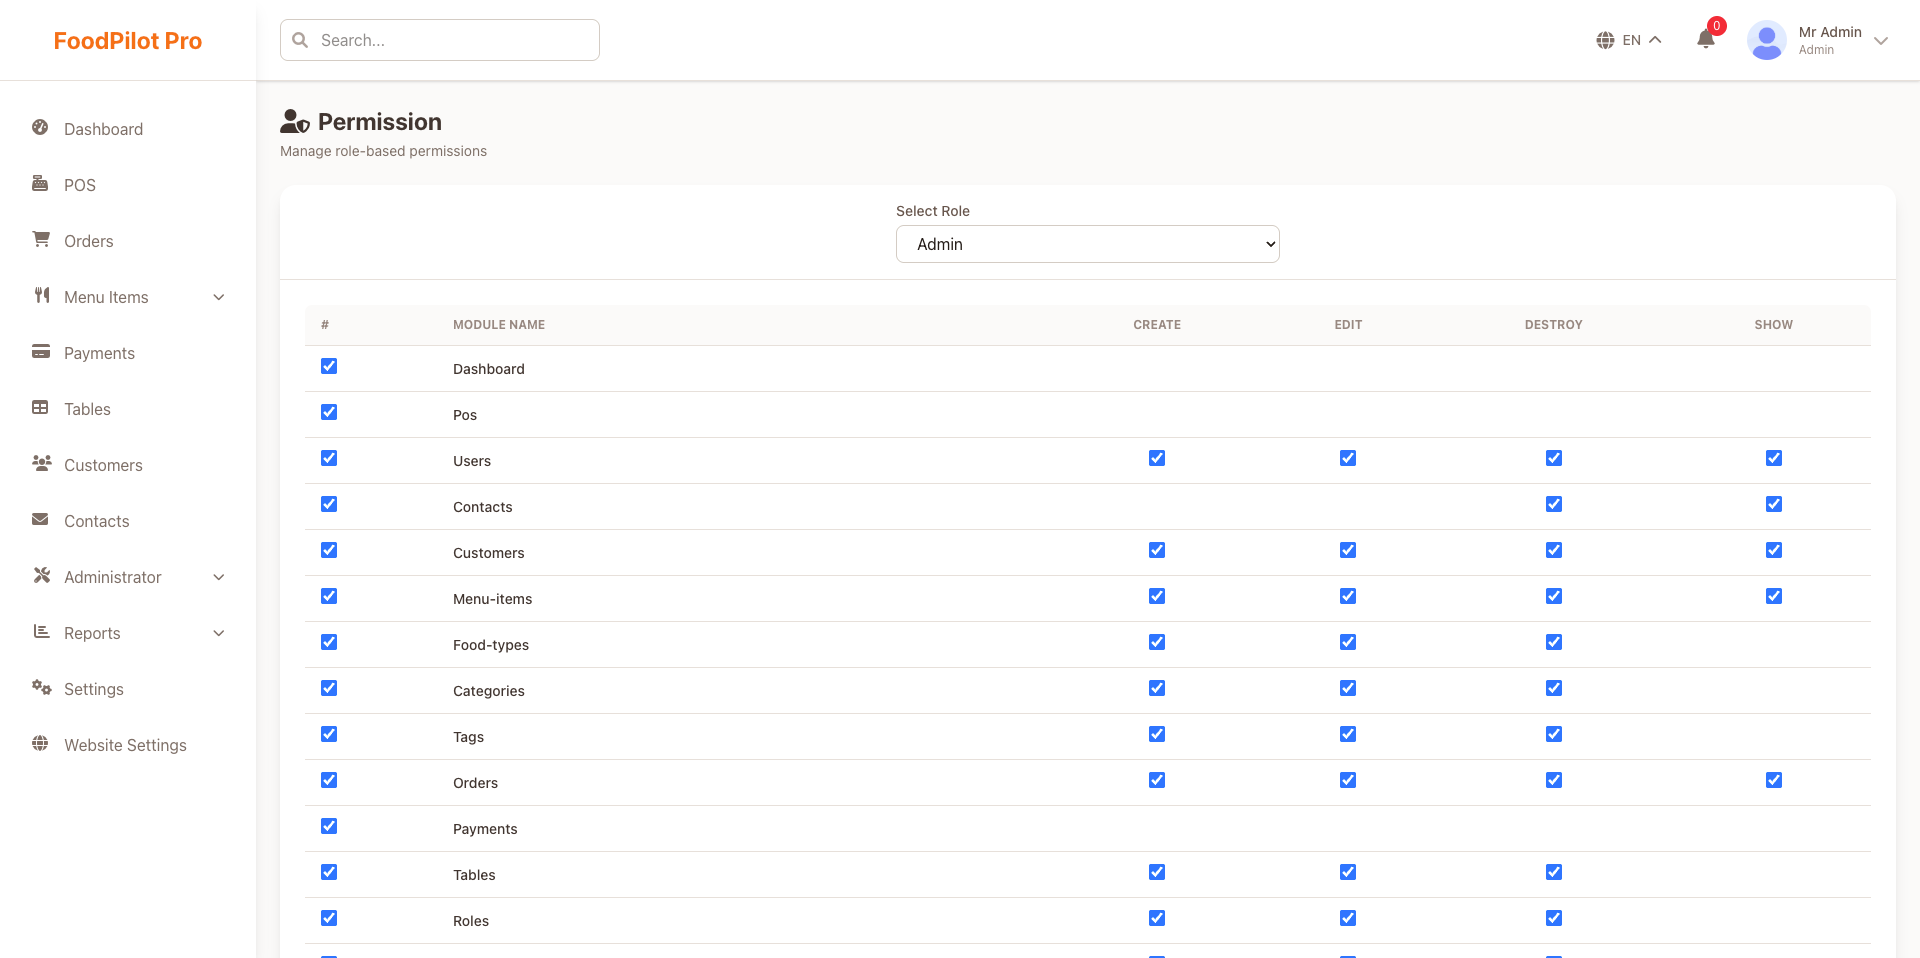
Roles & Permissions
Define fine-grained access for every staff member — from cashiers to branch managers — using a flexible role-based permission system.
- ✓ Create unlimited custom roles
- ✓ Toggle individual permissions per role
- ✓ Assign multiple roles to one user
- ✓ Suspend / activate accounts instantly
- ✓ Full audit log of admin actions
Homepage & Storefront Builder
Customize your customer-facing homepage without touching code — manage hero banners, featured sections, and promotional slots from the admin panel.
- ✓ Drag-and-drop section ordering
- ✓ Hero banner with CTA button and image upload
- ✓ Featured categories and item spotlights
- ✓ Announcement ticker and notification bar
- ✓ Live preview before publishing
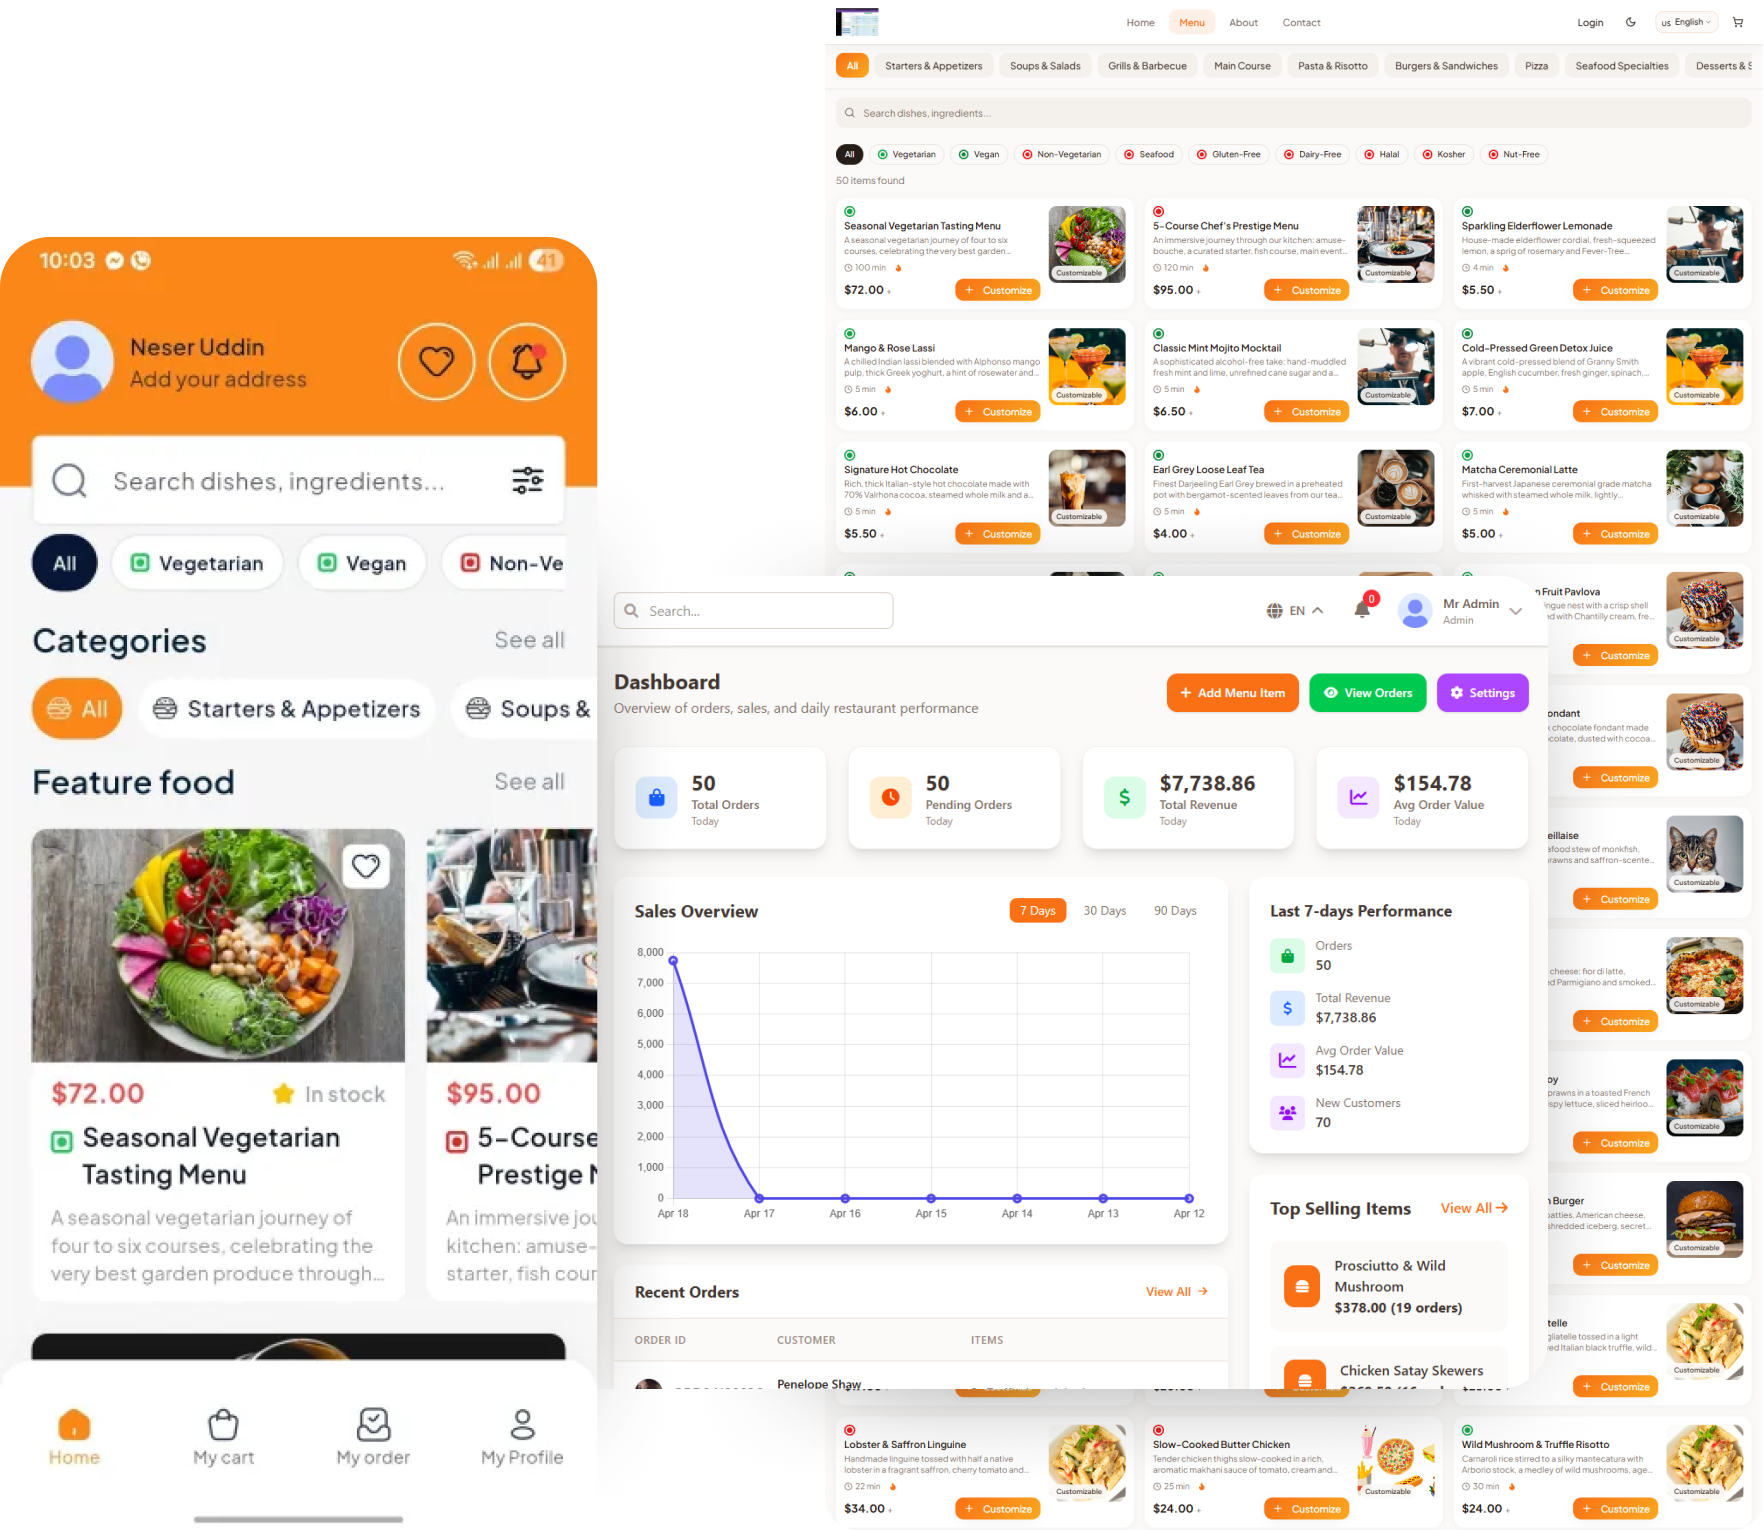
Responsive Customer Website
A fully responsive Next.js storefront served to customers — looks and works great on desktop, tablet, and mobile out of the box.
- ✓ Mobile-first responsive layout
- ✓ Fast page loads with Next.js SSR/SSG
- ✓ Real-time cart and checkout flow
- ✓ Live order status tracking page
- ✓ PWA-ready for home screen installation
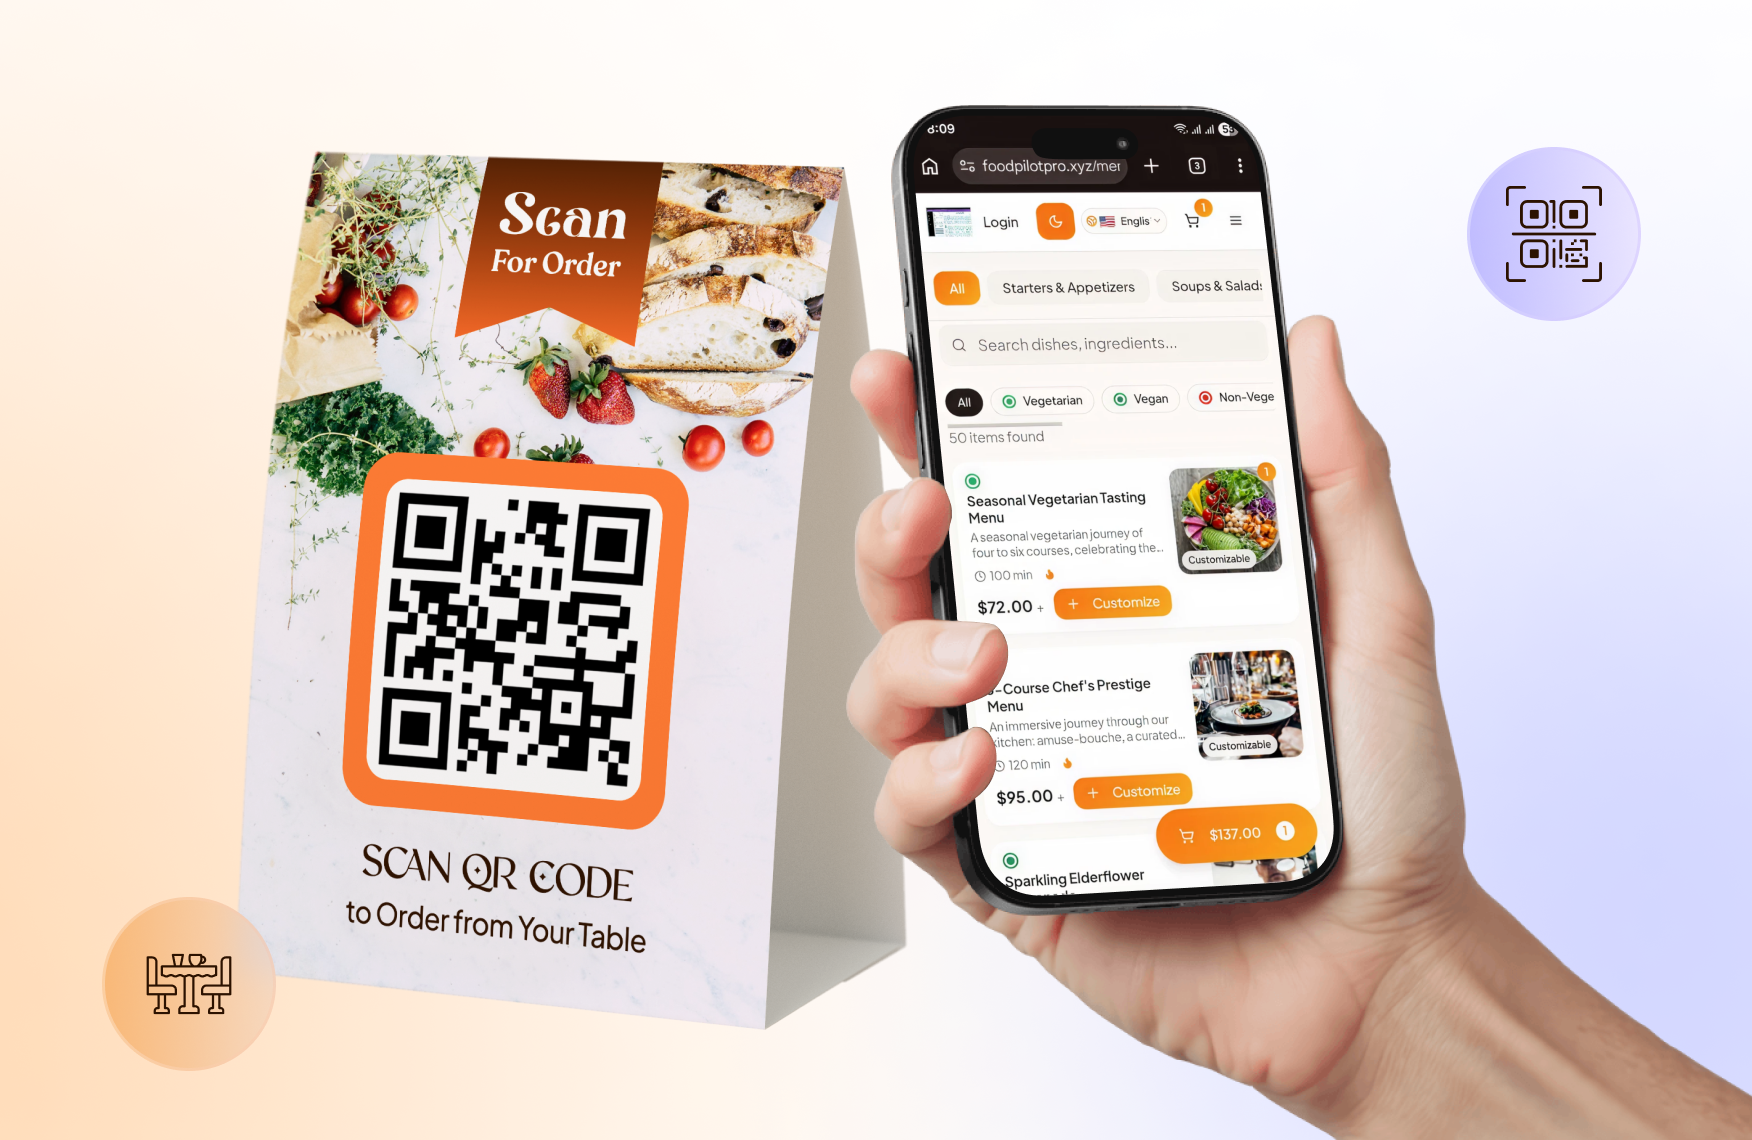
QR Code Menu
Generate per-table QR codes that open a branded digital menu instantly — no app download required, no staff interaction needed.
- ✓ Auto-generated QR code per table or zone
- ✓ Scannable branded menu with categories
- ✓ Customers order and pay at the table
- ✓ Orders flow directly into the kitchen queue
- ✓ Print-ready QR code PDFs from admin
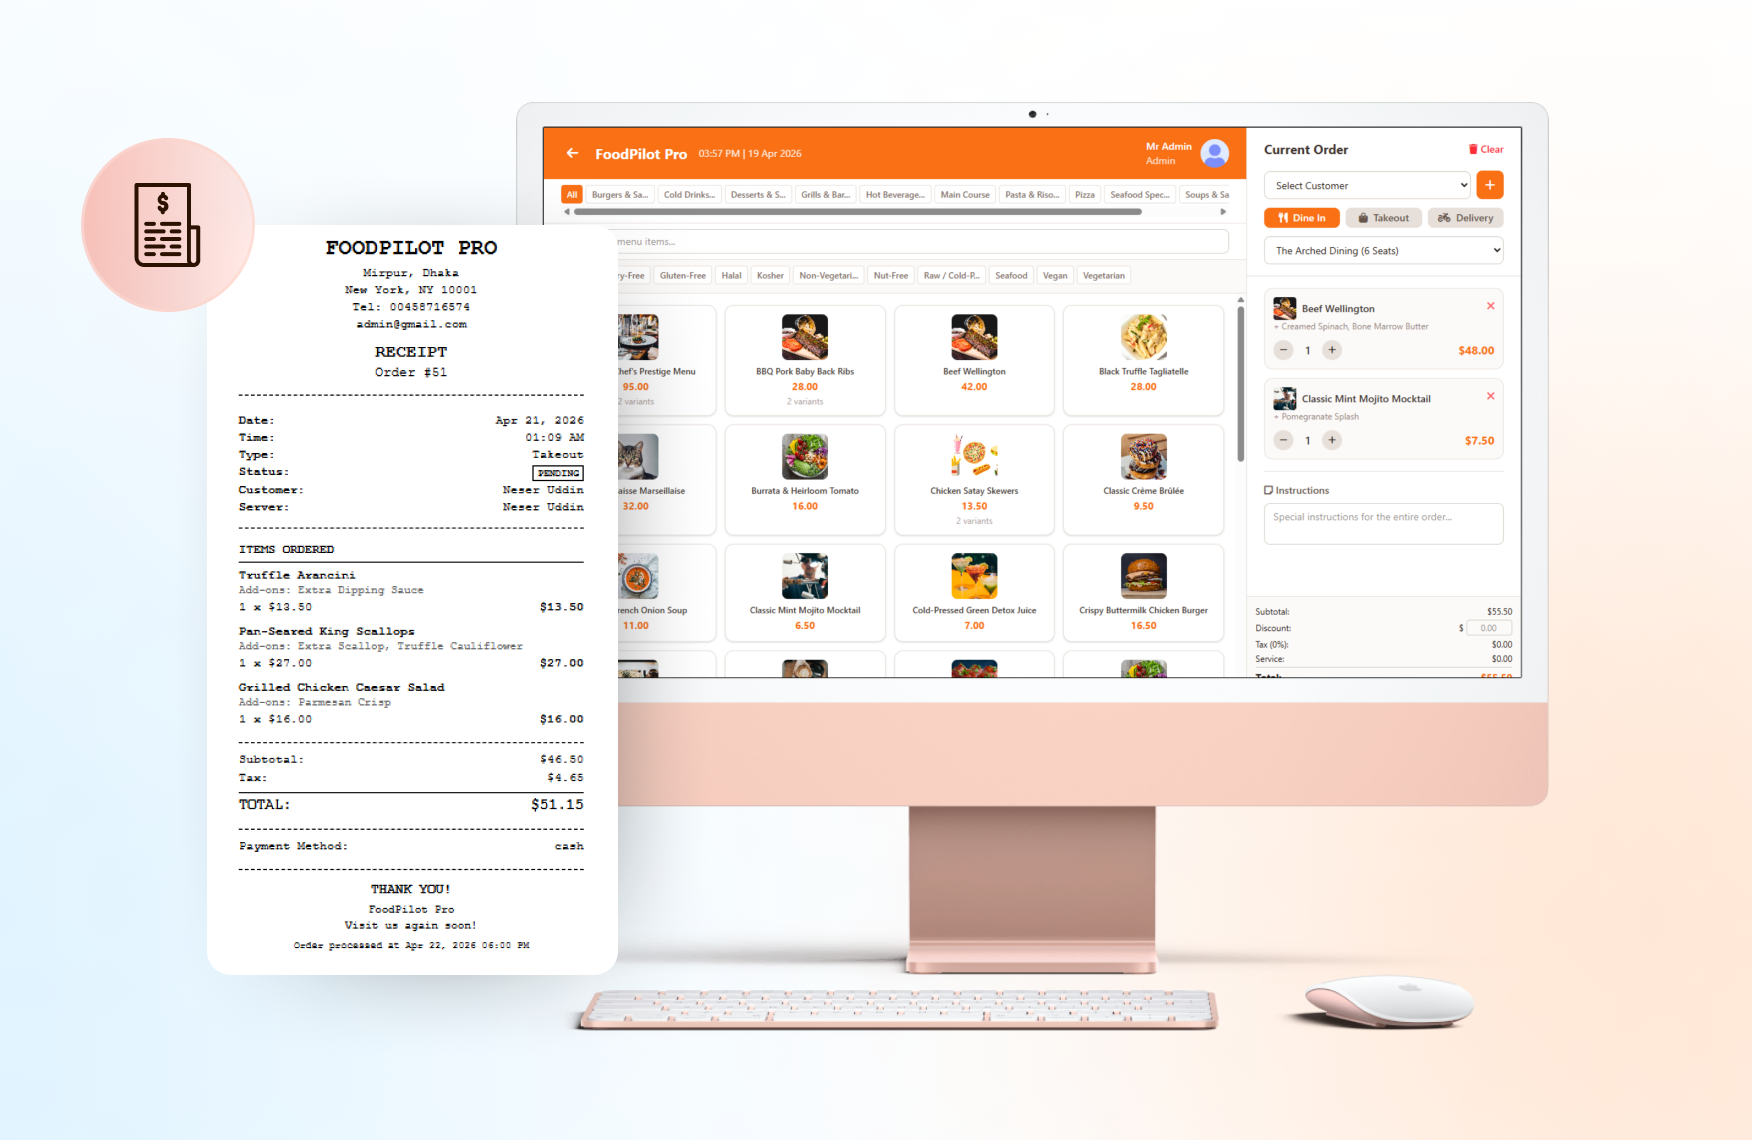
Point of Sale (POS)
A full in-store POS terminal built into the admin panel — handle walk-in orders, split payments, and print receipts without third-party hardware.
- ✓ Fast item search and cart builder
- ✓ Cash, card, and mixed payment support
- ✓ Apply coupons and discounts at checkout
- ✓ Thermal receipt printer integration
- ✓ POS orders sync with central order history
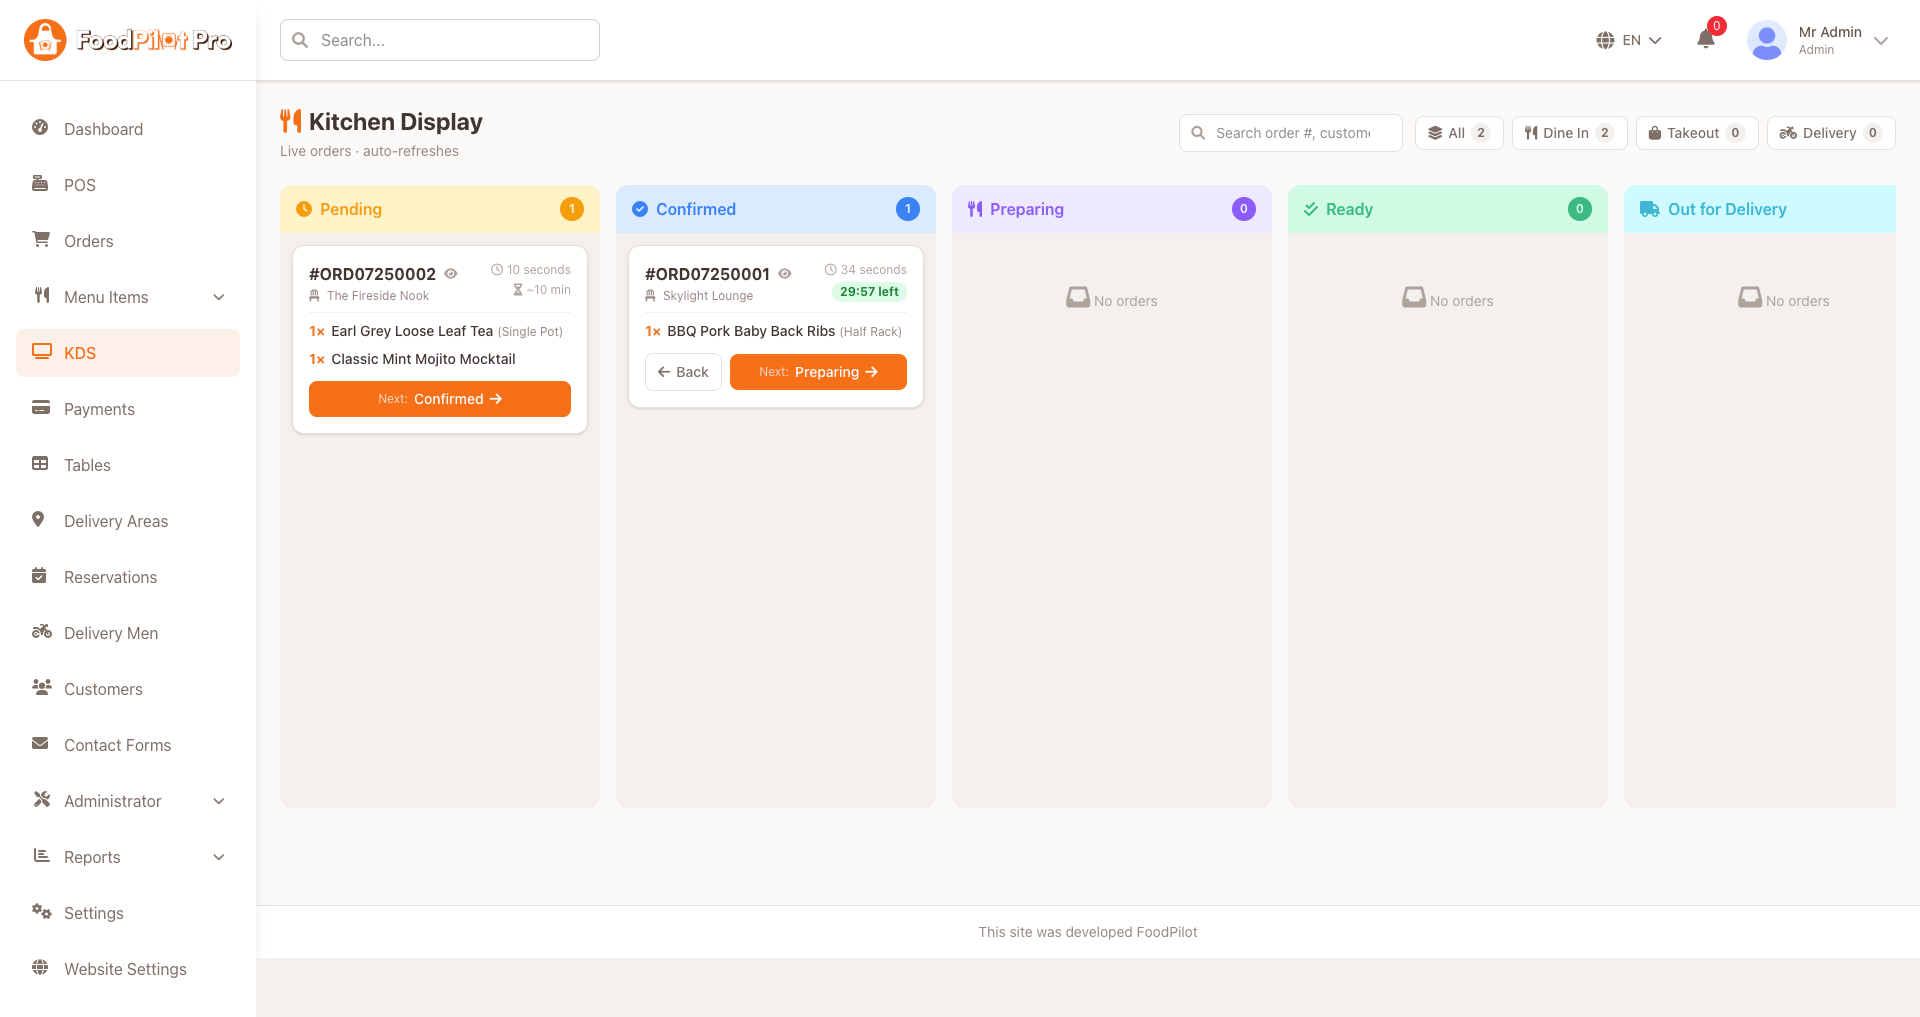
Kitchen Display System (KDS)
Replace paper tickets with a real-time digital kitchen screen — orders flow straight to the line, prep is timed, and nothing gets missed during a rush.
- ✓ Live order tickets pushed to kitchen screens
- ✓ Route items to prep stations (grill, fryer, bar)
- ✓ Color-coded prep timers and SLA alerts
- ✓ Bump / recall tickets when items are ready
- ✓ Works for dine-in, delivery, POS & QR orders
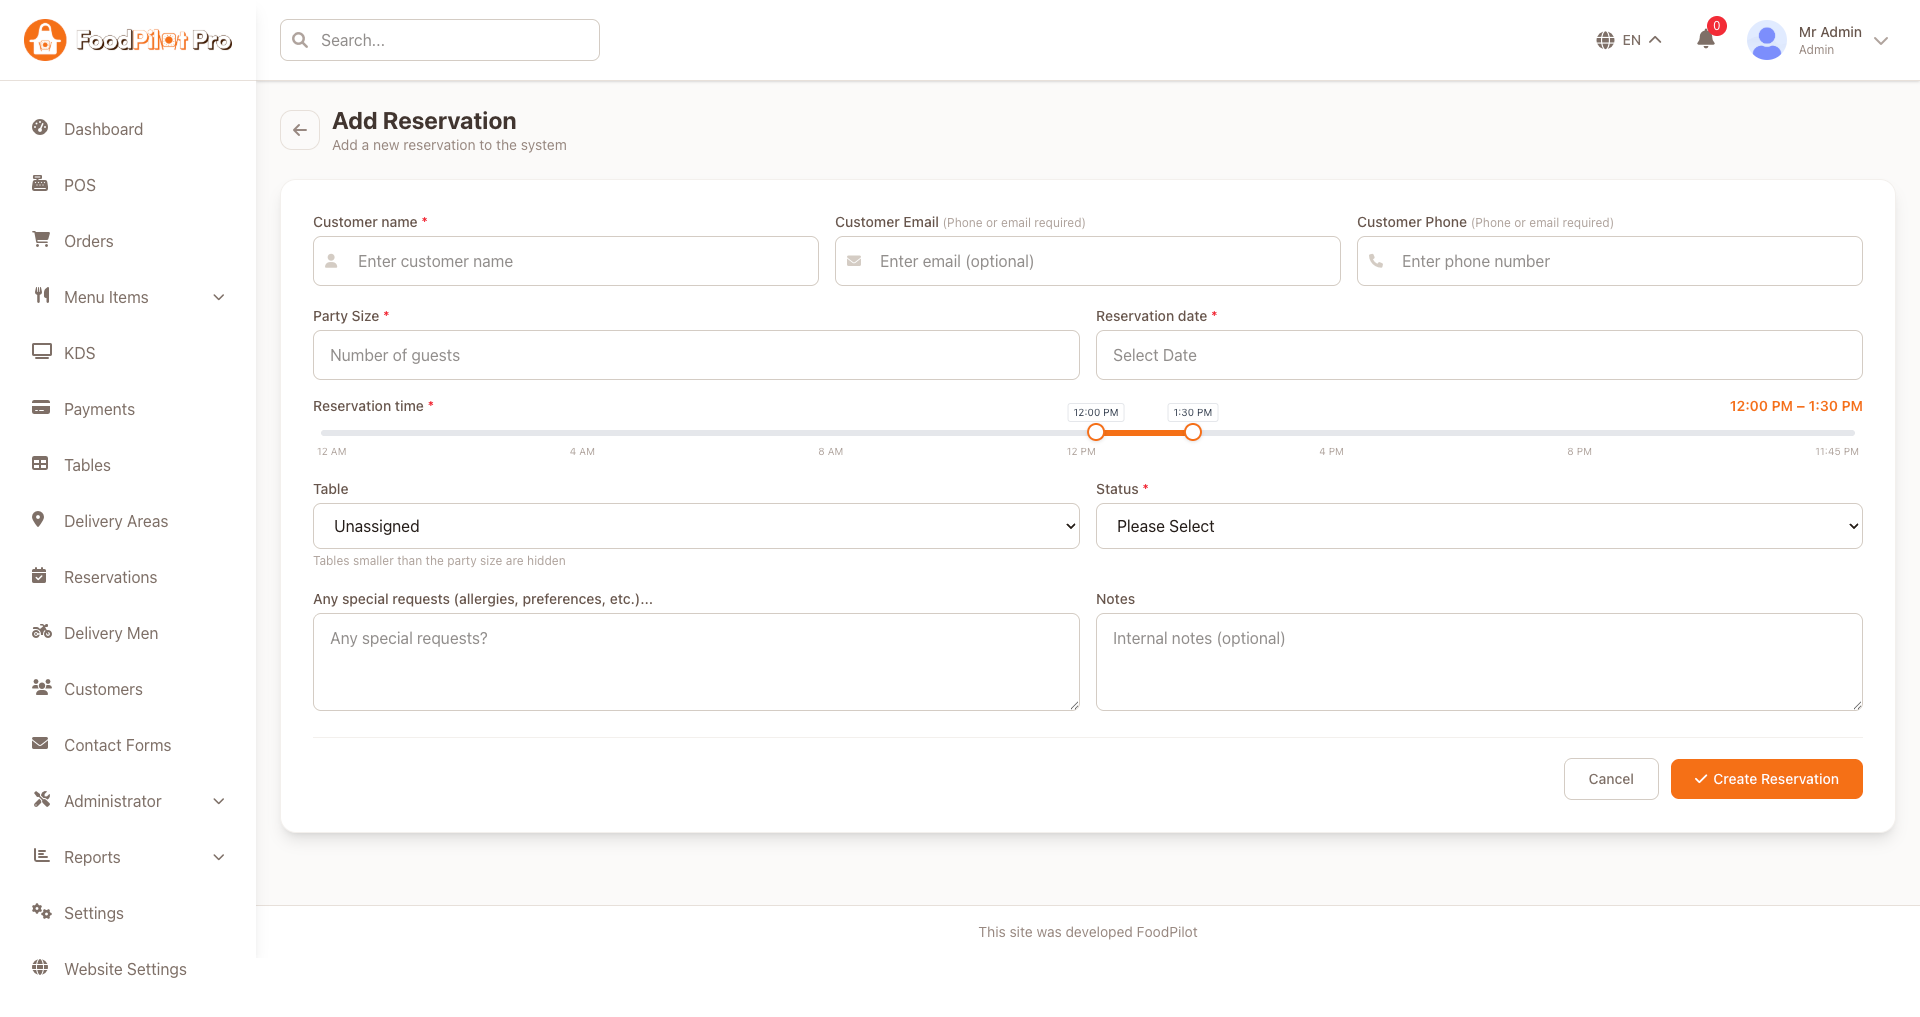
Table Reservation Management
Accept and manage table bookings from a single calendar — track availability, seat guests faster, and reduce no-shows with confirmations.
- ✓ Calendar & timeline view of all bookings
- ✓ Define tables, zones, and seating capacity
- ✓ Real-time availability by date & party size
- ✓ Approve, reschedule, or cancel reservations
- ✓ Automatic email / SMS booking confirmations
Requirements
Make sure your machine and hosting meet the following before you begin.
💻 Development Machine
- ✓ Node.js 20.x or higher
- ✓ npm 9+ or Yarn 1.22+
- ✓ Git
🌐 Hosting
- ✓ VPS with Node.js & PM2, or
- ✓ Vercel / Netlify recommended
- ✓ SSL Certificate (HTTPS)
Installation Guide
Deploy the Next.js client app on your server step by step.
Configure Domain (DNS Record)
In your domain registrar / DNS panel, add the following A records pointing to your VPS IP. If already done in the Server Setup section, skip ahead.
| Type | Name | Value |
|---|---|---|
| A | @ | YOUR_VPS_IP |
| A | www | YOUR_VPS_IP |
These records serve yourdomain.com and www.yourdomain.com from your VPS.
Extract & Install Dependencies
Navigate into the Next.js client folder and install all packages:
cd nextjs-client
npm install
Configure Environment
Copy .env.example → .env and update your values:
# App
NEXT_PUBLIC_APP_NAME=FoodPilot
NEXT_PUBLIC_APP_URL=https://yourdomain.com
Change NEXT_PUBLIC_APP_NAME to your own brand name — this appears in the browser tab, header, and emails.
Build for Production & Start with PM2
Build the optimised bundle, then launch as a persistent background process:
npm run build

pm2 start npm --name "foodpilot-client" -- start
pm2 save
pm2 startup   # copy & run the command PM2 outputs
pm2 list
pm2 logs foodpilot-client
Deploy to Vercel alternative
Skip PM2 and Nginx entirely — Vercel handles builds, CDN, and SSL automatically:
npm i -g vercel
vercel login
vercel --prod
Add all NEXT_PUBLIC_* env variables under Vercel → Project → Settings → Environment Variables.
Before going live, verify:
NEXT_PUBLIC_API_URLpoints to your live Laravel API —https://admin.yourdomain.com/api- PM2 process is running:
pm2 list - Nginx proxy is active and forwarding port 3000 with HTTPS
Client App Features
Key screens of the Next.js customer web application.

Dynamic Homepage
The first thing customers see — designed to drive engagement with promotions and fast food discovery.
- ✓ Hero banner with custom promotions
- ✓ Featured restaurant listings
- ✓ Quick category navigation bar
- ✓ Top-rated food items grid
- ✓ Search bar with instant results
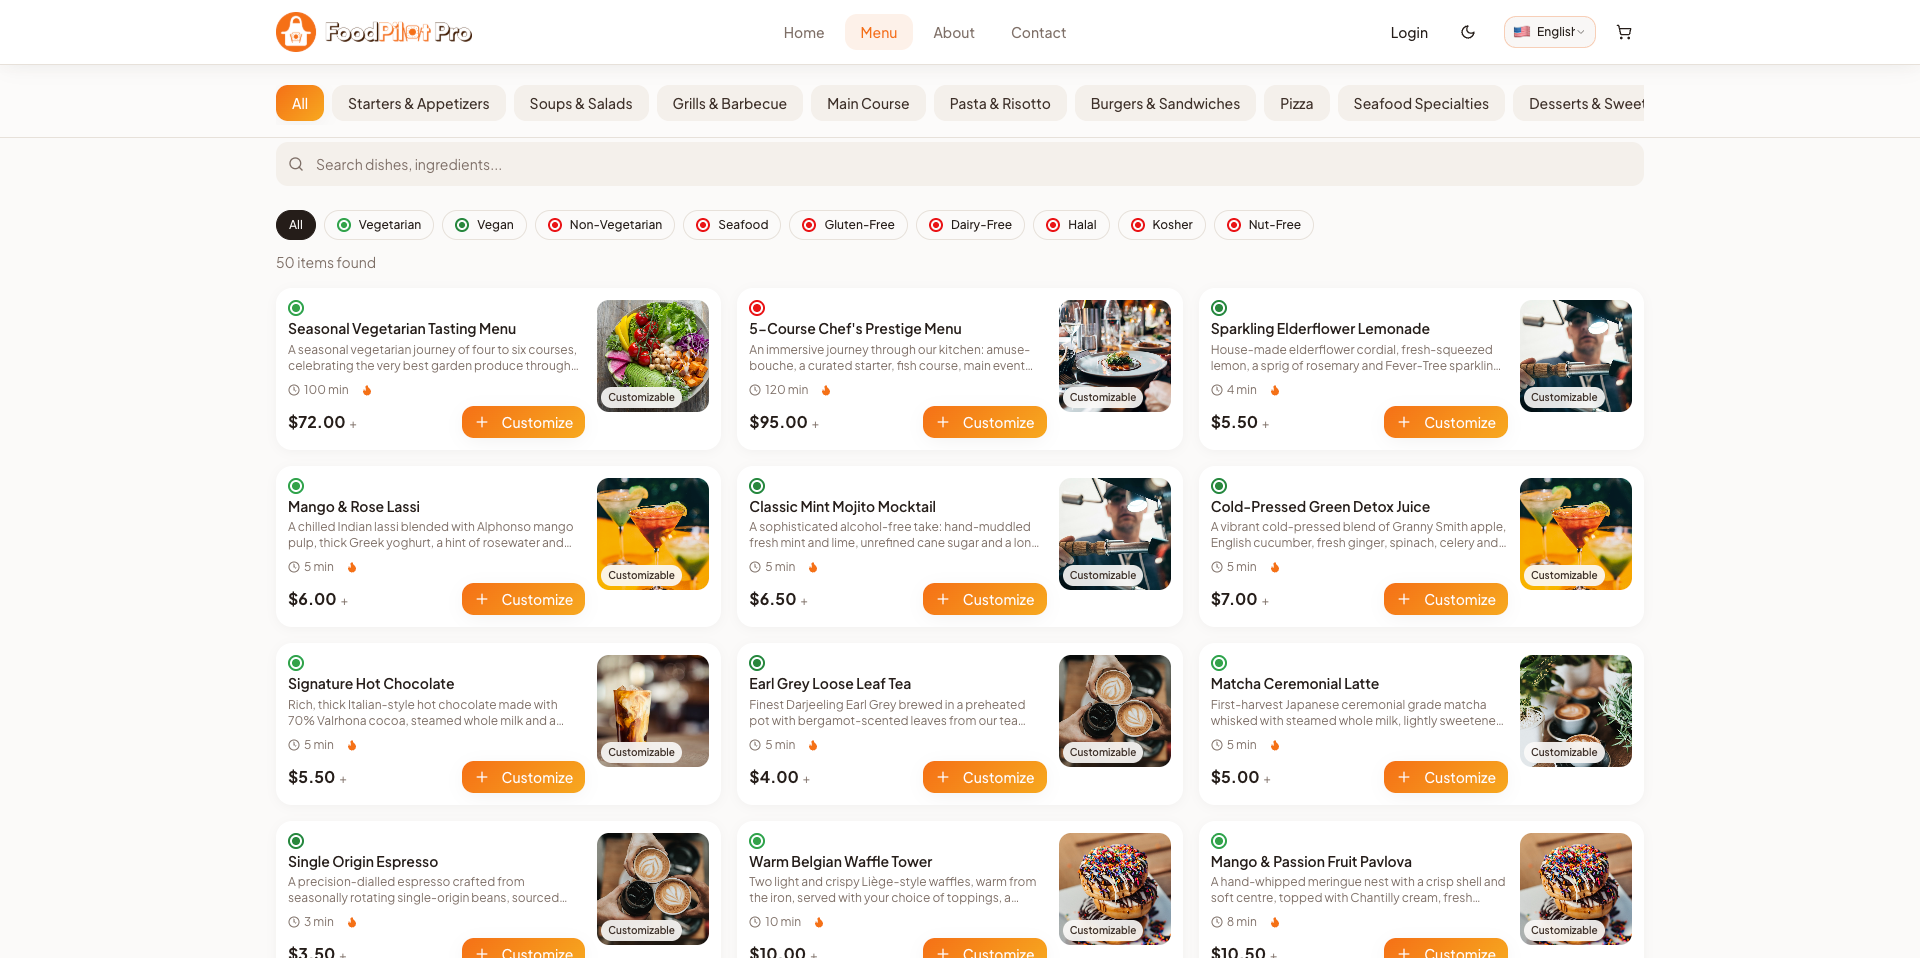
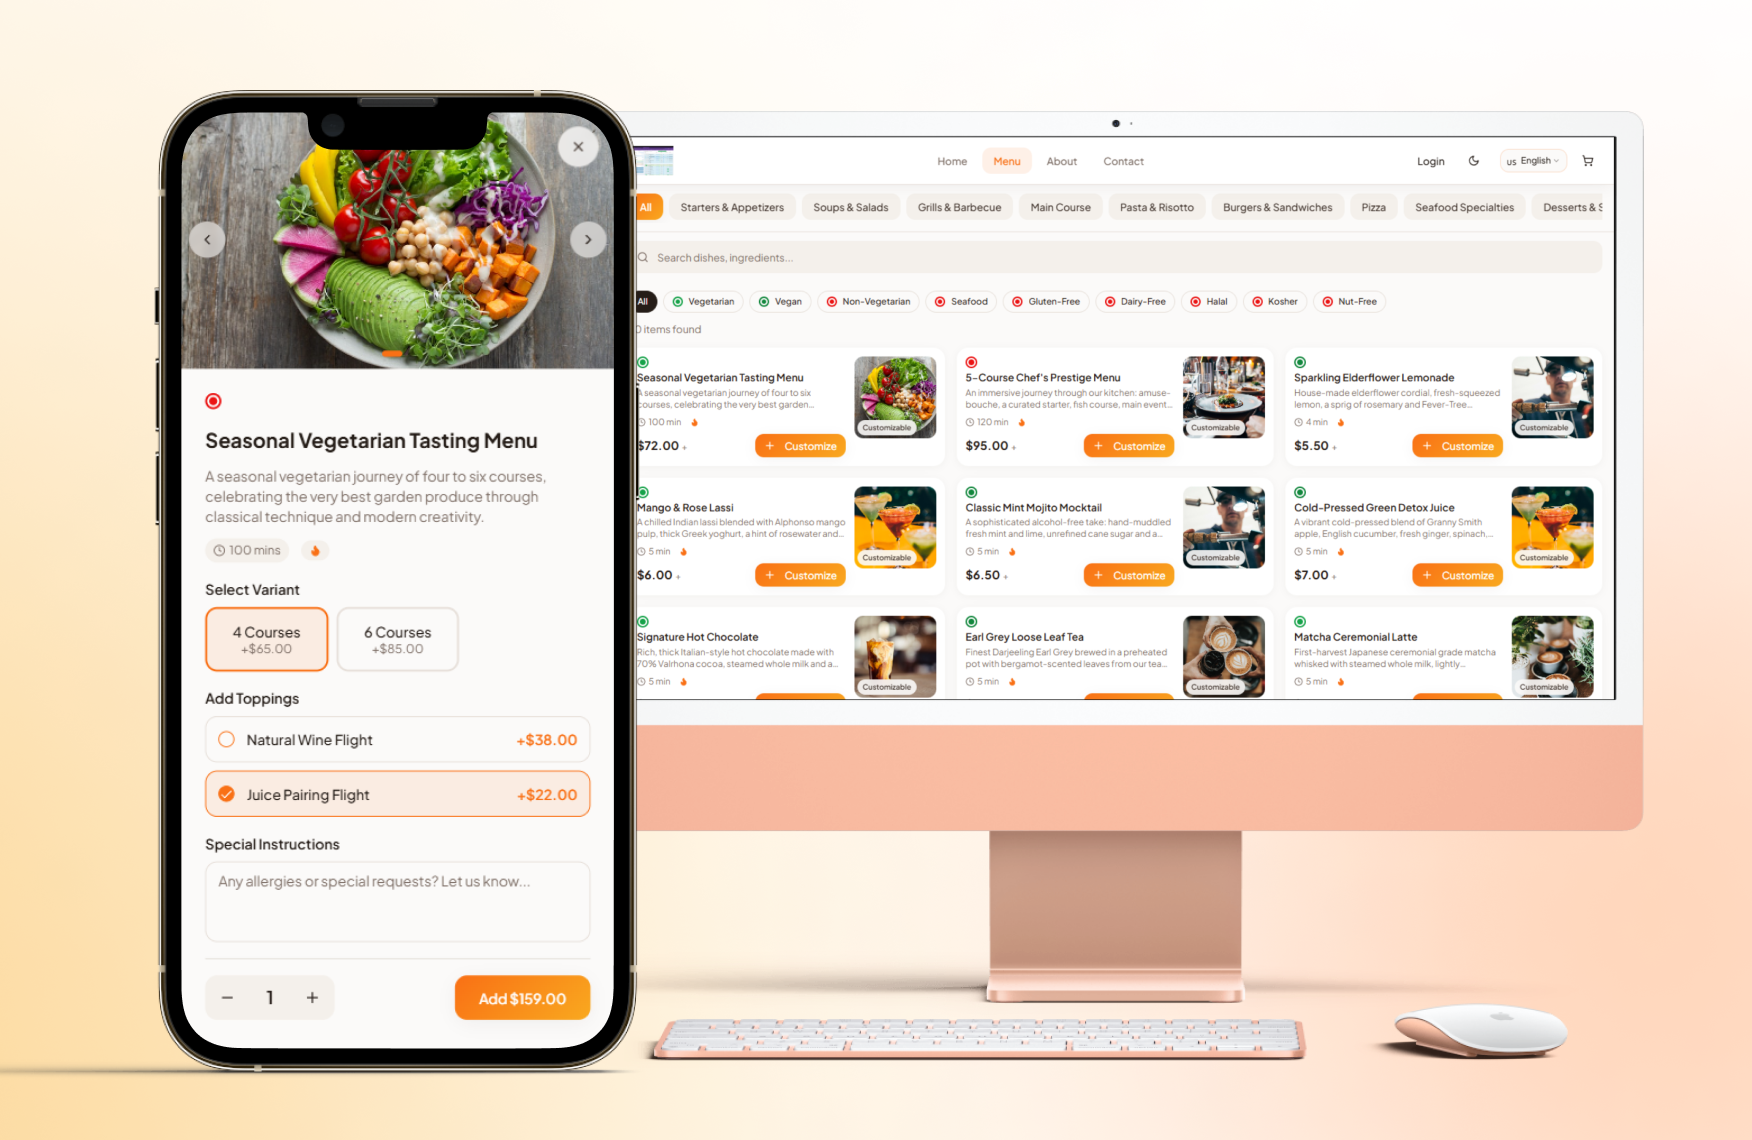
Menu & Categories
Clean, fast browsing experience for customers to explore the full menu with smart filtering.
- ✓ Category and subcategory filtering
- ✓ Search by food name or ingredient
- ✓ Dietary badges (Vegan, Halal, Spicy)
- ✓ Food item detail modal with images
- ✓ Add to cart with custom options
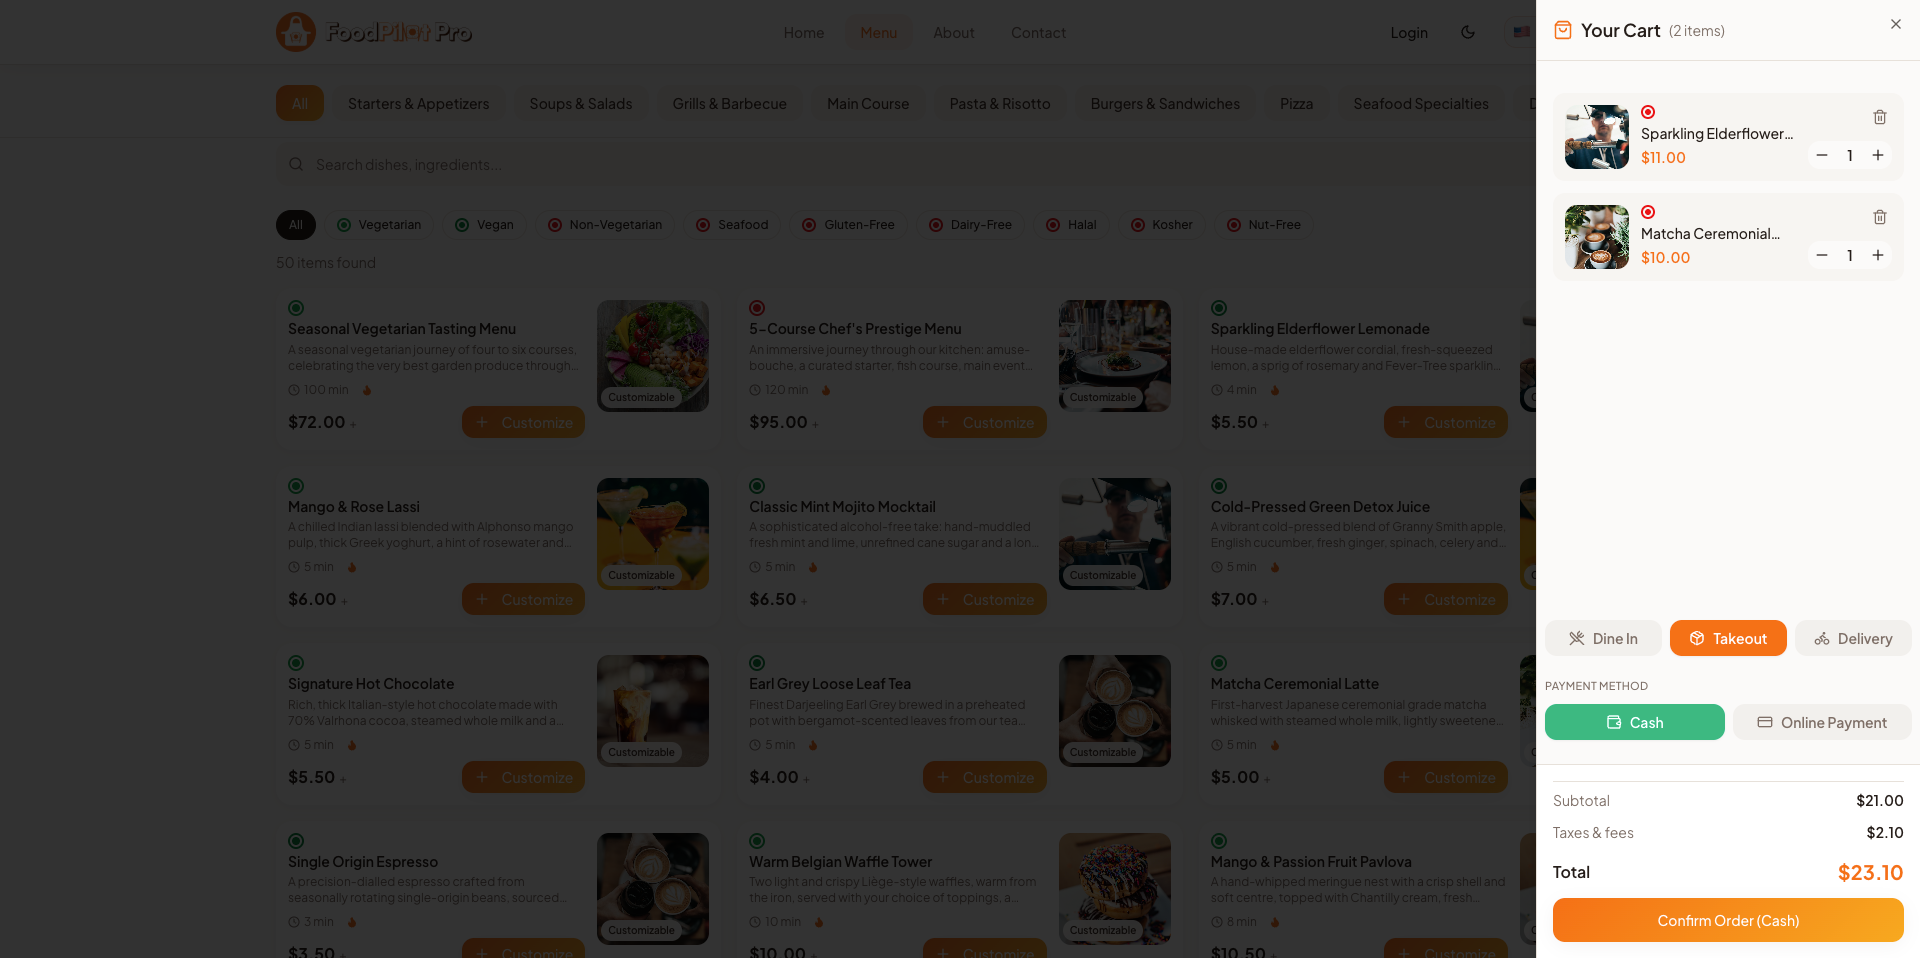
Cart & Checkout
Frictionless checkout flow from cart review to payment confirmation in just a few taps.
- ✓ Cart item management and quantities
- ✓ Apply coupon codes
- ✓ Saved delivery address selection
- ✓ Multiple payment methods
- ✓ Order summary and total breakdown
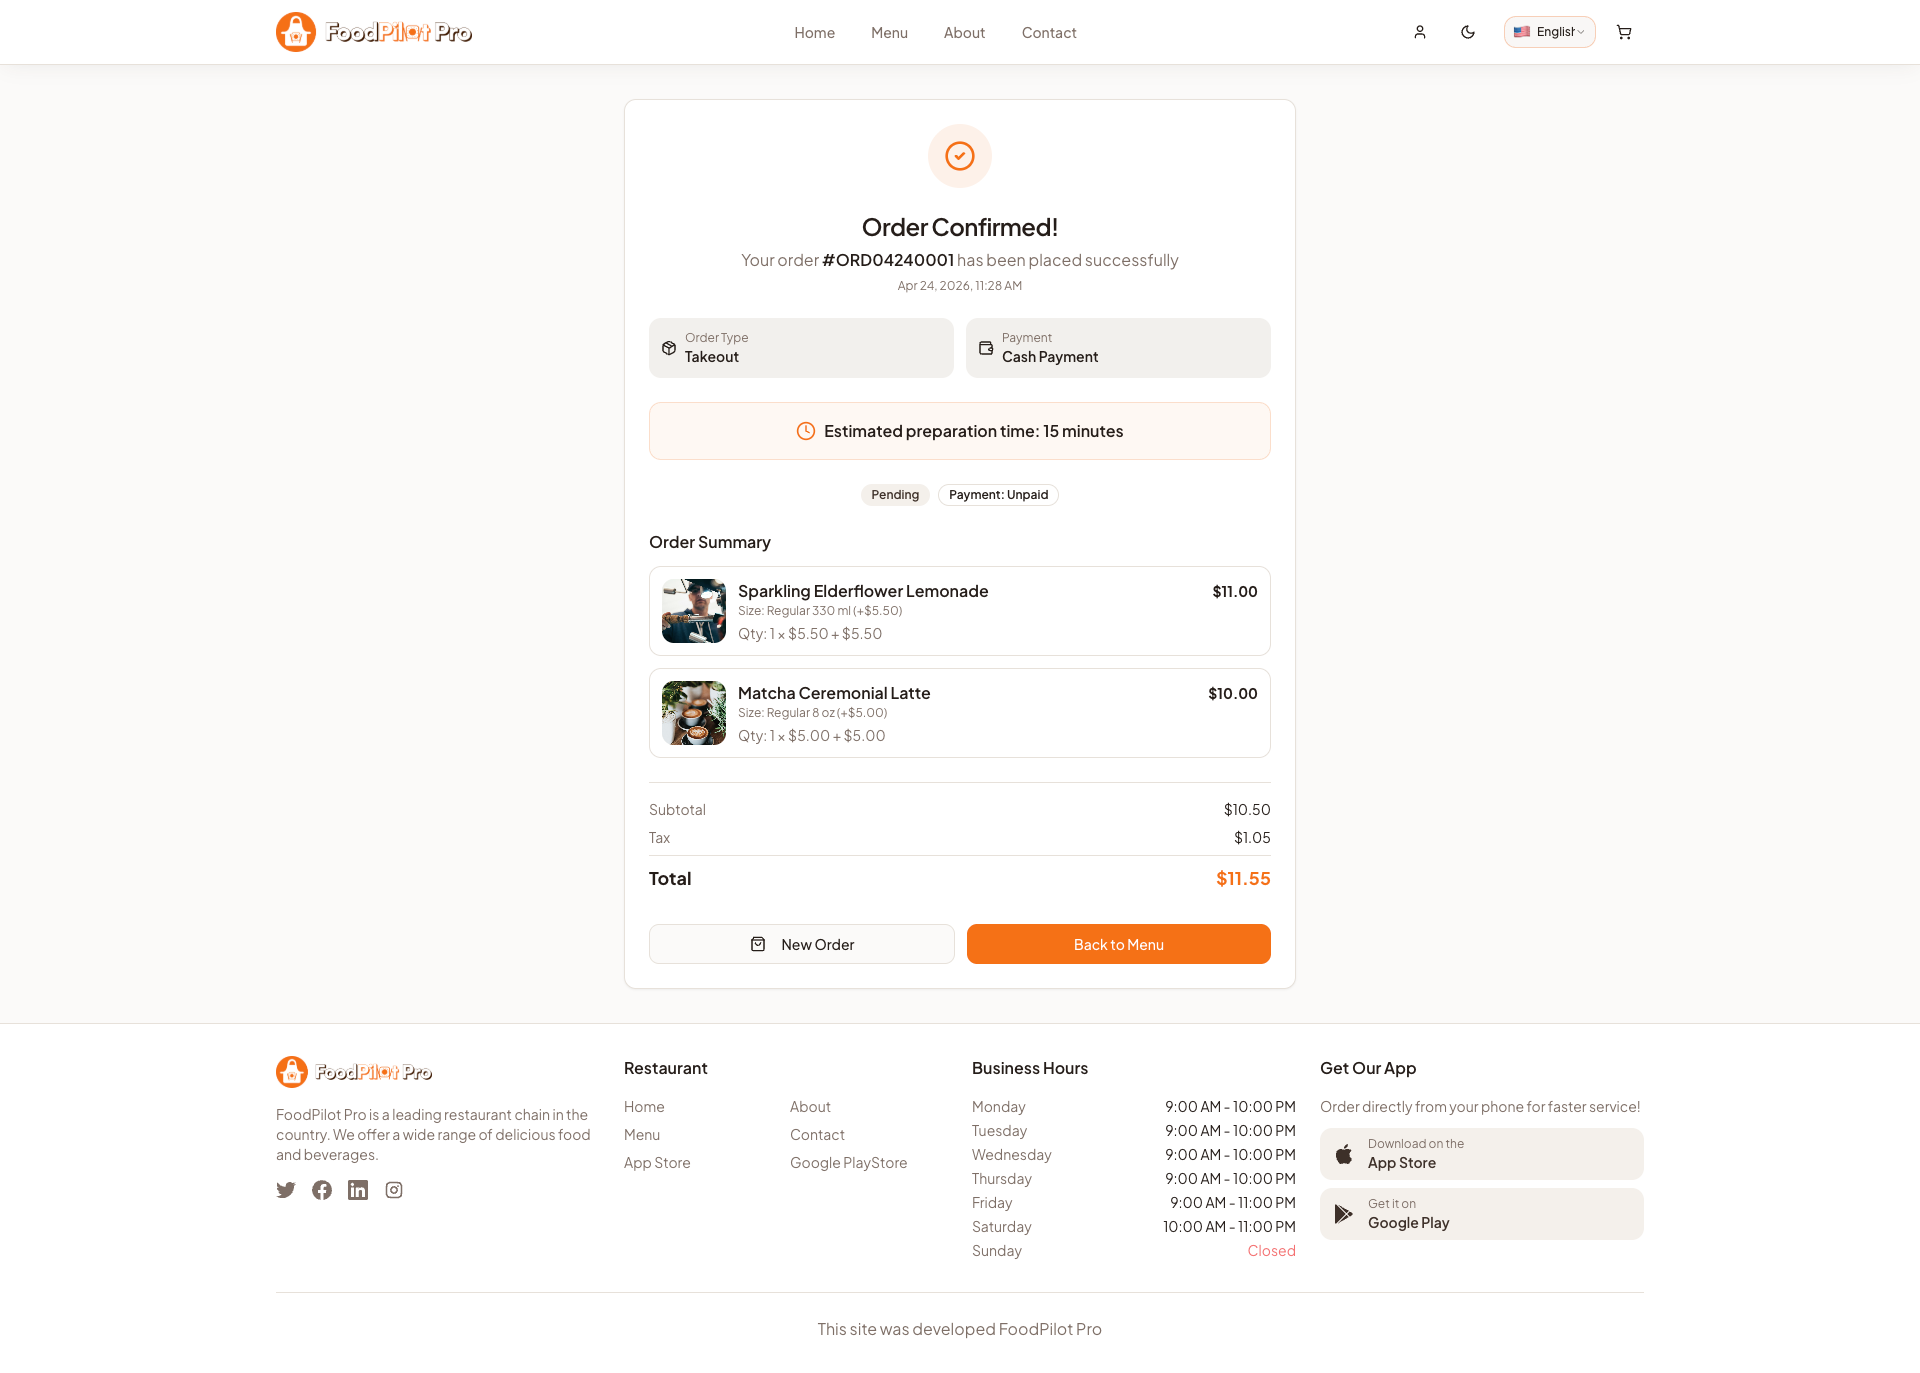
Real-Time Order Tracking
Customers can follow their order every step of the way with live map and status updates.
- ✓ Step-by-step order status timeline
- ✓ Live map with driver location
- ✓ Estimated arrival time
- ✓ Push notification updates
- ✓ Contact driver option
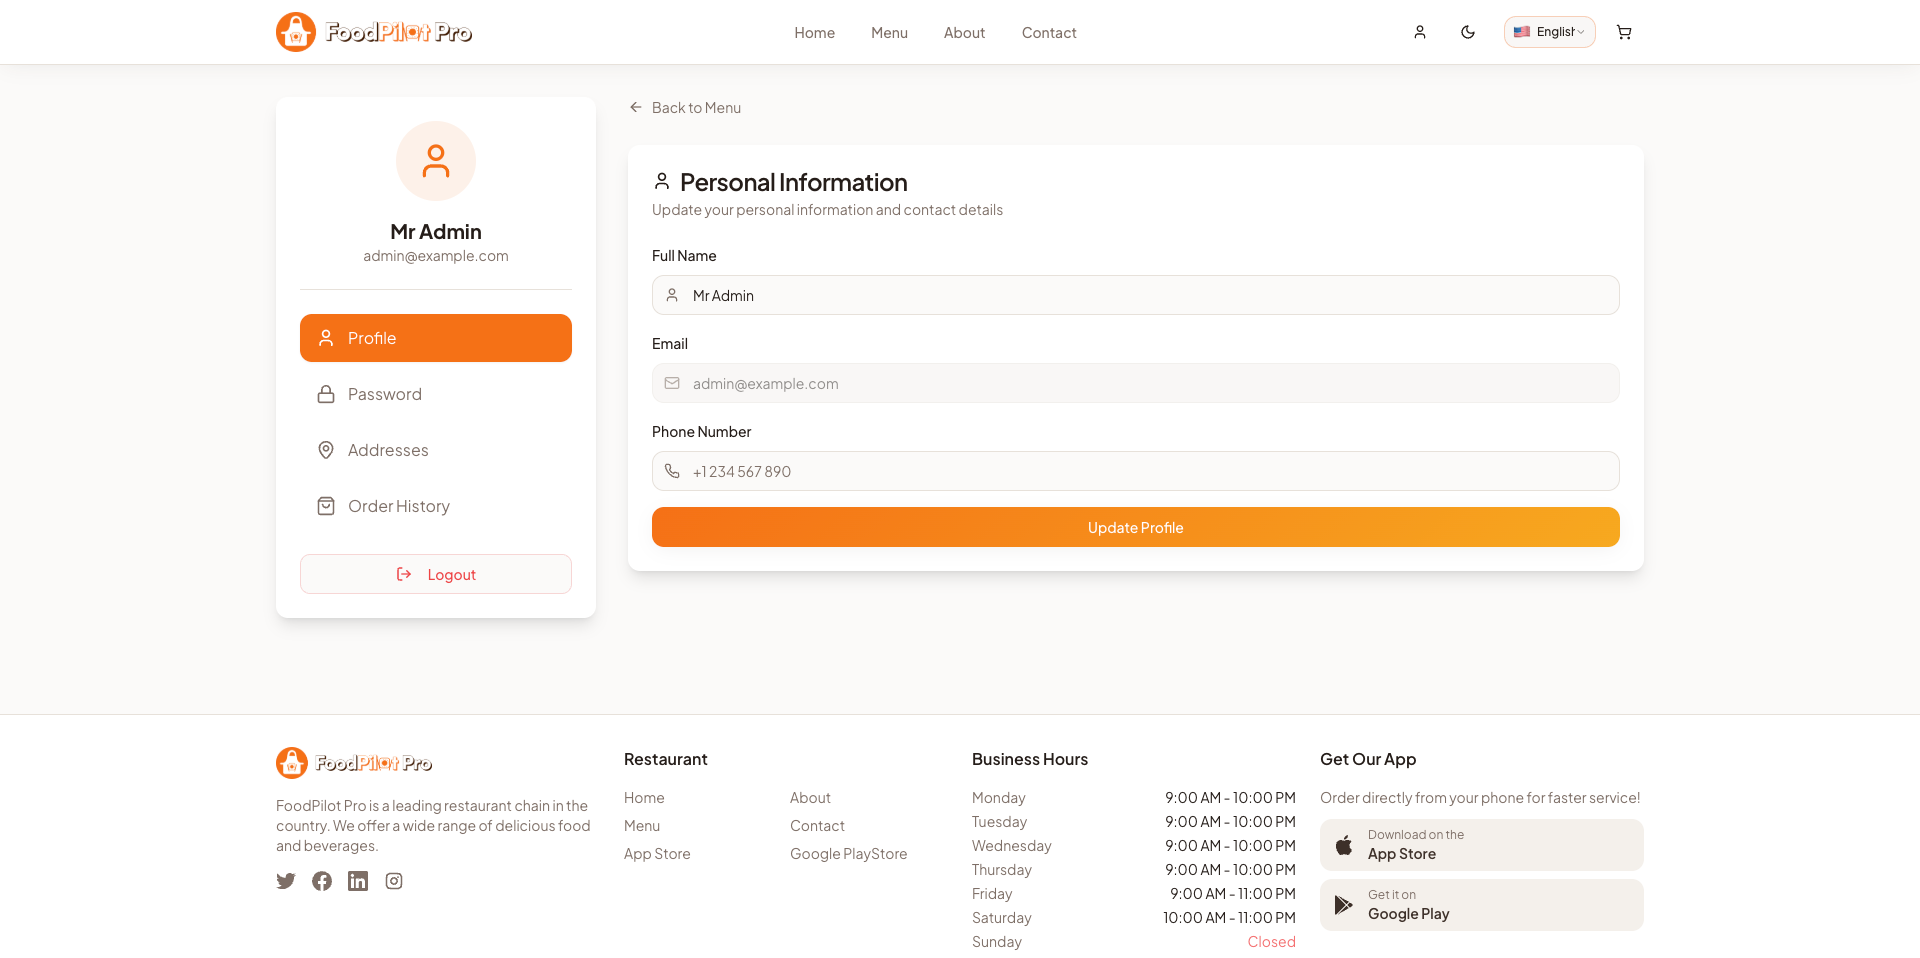
Customer Profile
A personalized space for customers to manage their account, orders, and preferences.
- ✓ Edit profile and contact information
- ✓ Manage saved delivery addresses
- ✓ Full order history with reorder
- ✓ Wallet balance and top-up
- ✓ Notification preferences

Authentication Flow
Secure, smooth sign-up and login experience with OTP phone verification and social login options.
- ✓ Email and phone registration
- ✓ OTP-based phone verification
- ✓ Social login (Google, Facebook)
- ✓ Forgot password with email reset
- ✓ Remember device for quick login
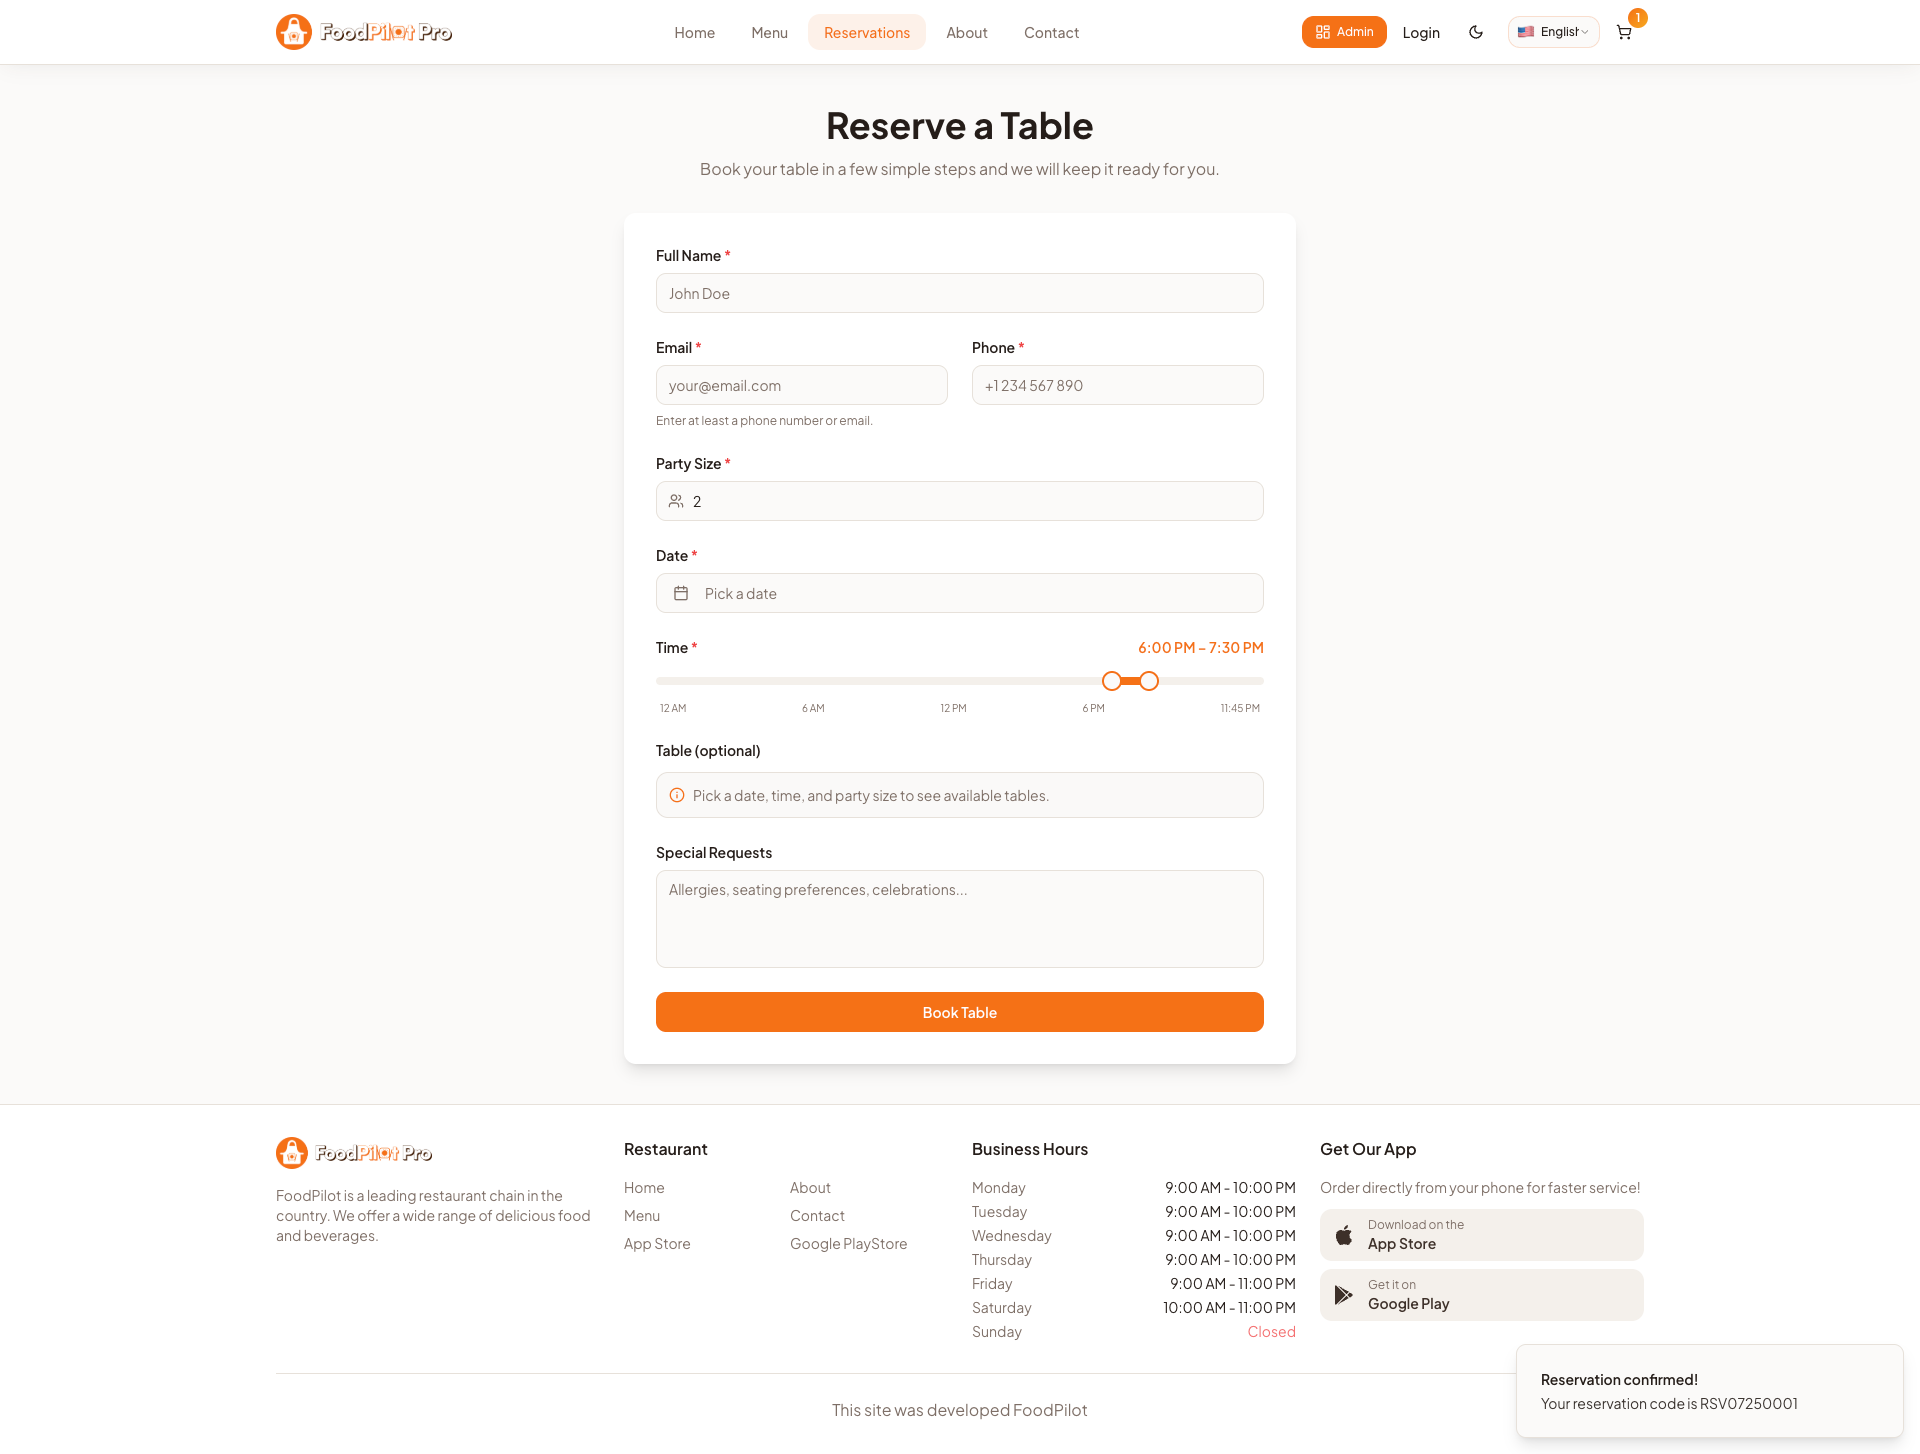
Table Reservation
Let customers book a table online in seconds — pick a date, time, and party size, and get instant confirmation without a phone call.
- ✓ Choose date, time slot, and number of guests
- ✓ See real-time table availability
- ✓ Add special requests or occasion notes
- ✓ Instant booking confirmation & reminders
- ✓ Manage or cancel bookings from the profile
Requirements
Make sure your development machine meets the following before running or building the Flutter customer app. The same toolchain also builds the Delivery App.
💻 Development Machine
- ✓ Flutter 3.x or higher
- ✓ Dart 3.x
- ✓ Android Studio or VS Code
- ✓ Git
📱 Platform SDKs
- ✓ Android SDK (API 21+)
- ✓ Xcode 15+ (macOS only, for iOS)
- ✓ CocoaPods (for iOS dependencies)
flutter doctor — all items should show a green checkmark before proceeding.
Installation Guide
Get the Flutter customer app running on your local machine step by step.
Extract & Open Project
Extract the downloaded ZIP and open the Flutter customer app folder:
cd flutter-customer-app
flutter pub get
Configure Base URL
Point the app to your live Laravel API — see the Base URL section below for details.
Run on Device / Emulator
flutter run
Specify a target: flutter run -d android or flutter run -d ios
Build for Release
# Android APK / AAB
flutter build apk --release
flutter build appbundle --release

# iOS (macOS only)
flutter build ios --release
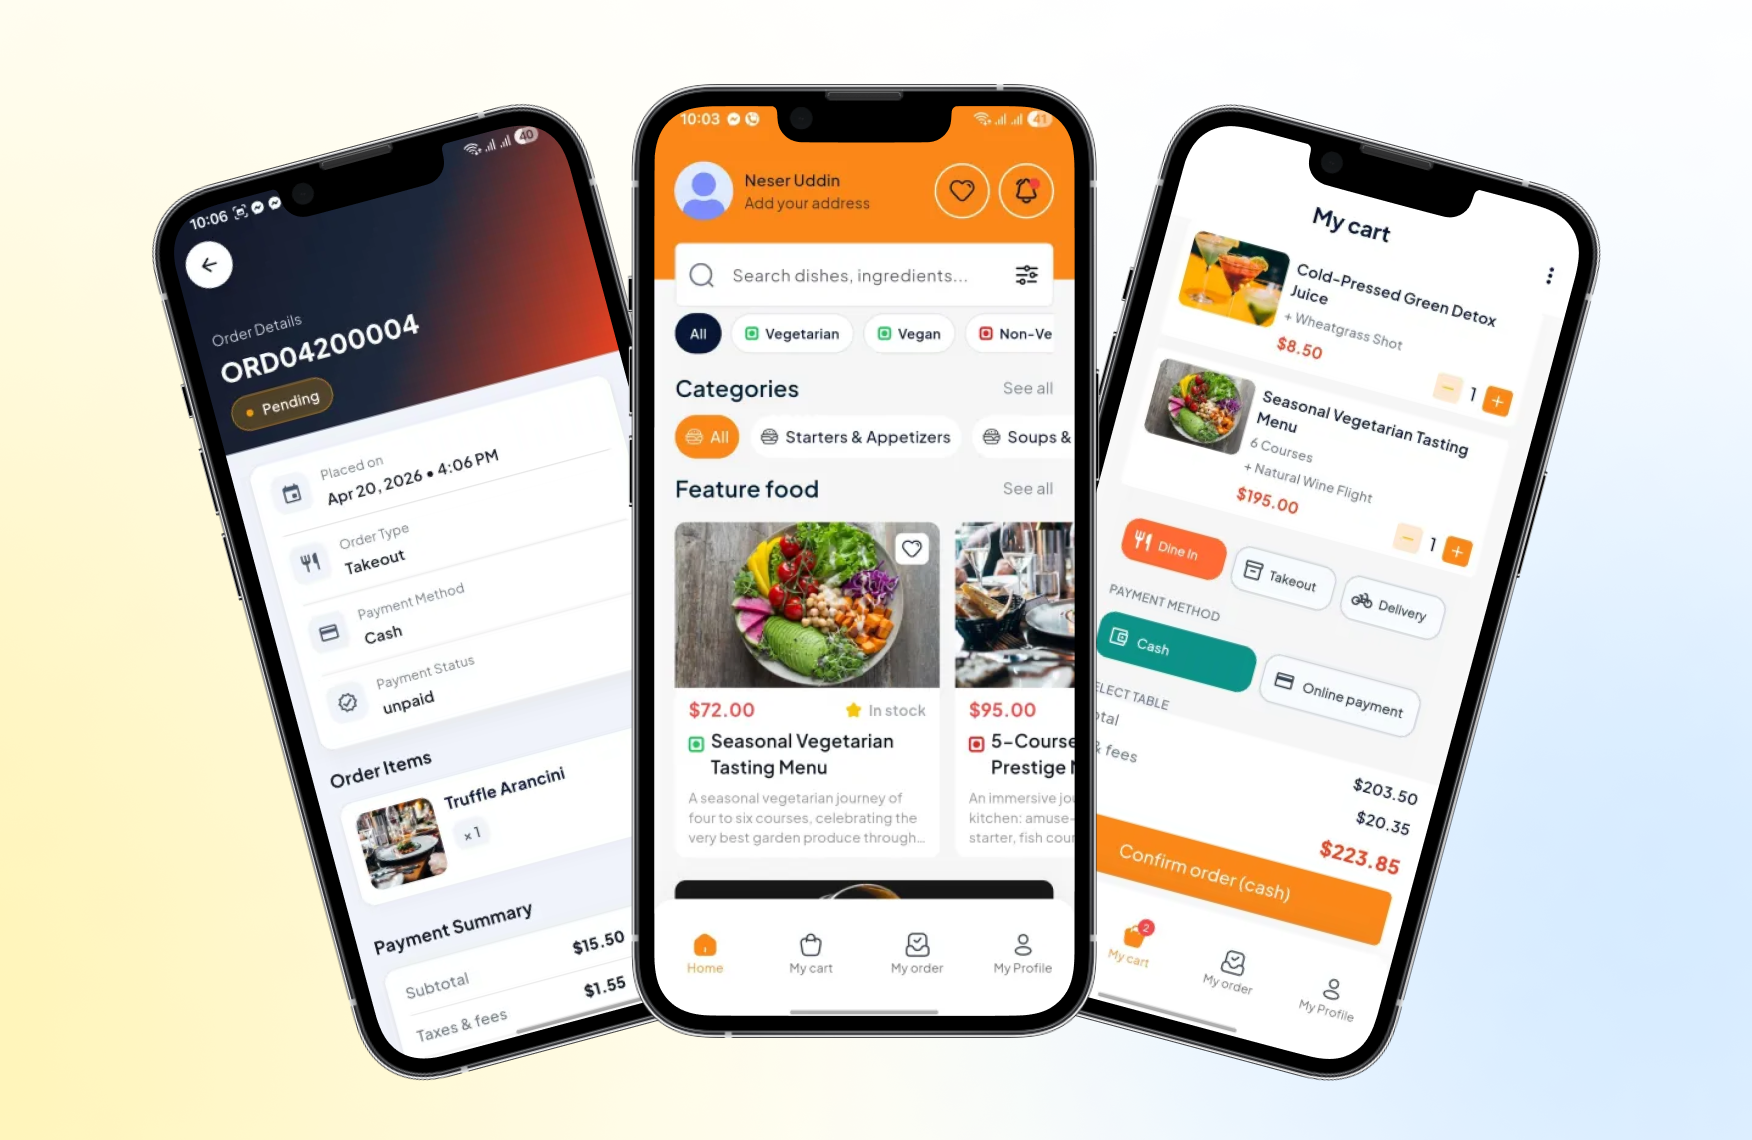
Customer App Features
The native Flutter experience customers use to order on the go — fast, offline-aware, and packed with the full ordering journey from discovery to live tracking.
Home & Discovery
Promotions, featured items, categories, and instant search on the home screen.
Menu & Item Details
Browse categories, view item details, choose variants and add-ons.
Cart & Checkout
Coupons, saved addresses, and multiple payment methods in a few taps.
Live Order Tracking
Real-time status timeline and driver location on a live map.
Table Reservation
Book a table by date, time, and party size right from the app.
Push Notifications
Order updates, offers, and delivery alerts via Firebase Cloud Messaging.
Profile & Wallet
Order history, reorder, saved addresses, and wallet balance.
Multi-language & RTL
Localized labels with full right-to-left language support.
Base URL Setup
Connect the Flutter customer app to your deployed Laravel API.
// MyApp/lib/core/config/app_config.dart
static const String apiBaseUrl = String.fromEnvironment(
  'API_BASE_URL',
  defaultValue: 'https://your-domain.com/api',  // here replace your domain
);
Base URL must point to the admin api domain, not the web app domain. No trailing slash.
Change App Name
1. Android
// android/app/src/main/AndroidManifest.xml
android:label="YourAppName"
2. iOS
// ios/Runner/Info.plist
<key>CFBundleName</key>
<string>YourAppName</string>
Change Package Name
Update Android namespace globally before publishing.
// android/app/build.gradle
android {
  namespace = "com.yourcompany.yourapp"
  defaultConfig {
    applicationId = "com.yourcompany.yourapp"
  }
}
Global Find & Replace
Verify these files after replacement:
- android/app/build.gradle
- android/app/src/main/AndroidManifest.xml
- android/app/src/debug/AndroidManifest.xml
- android/app/src/main/java/ (or kotlin/)
flutter clean && flutter pub get && flutter run
Change App Icon
Generate icon sets and replace for both platforms.
Generate all sizes with appicon.co — upload a 1024×1024 PNG and download all sizes.
MyApp/assets/images/logo.png
MyApp/assets/images/top_logo.png
flutter clean && flutter pub get
To generate all platform app icons, run this command
flutter pub run flutter_launcher_icons:main
Successfully generated launcher icons
flutter run
Build for Android
Release APK
flutter build apk --release
# Output: build/app/outputs/flutter-apk/app-release.apk
Split APKs (smaller download size)
flutter build apk --target-platform android-arm,android-arm64,android-x64 --split-per-abi
AAB — Google Play Store
Create signing keystore:
# macOS/Linux
keytool -genkey -v -keystore ~/upload-keystore.jks \
  -keyalg RSA -keysize 2048 -validity 10000 -alias upload

# Windows PowerShell
keytool -genkey -v -keystore $env:USERPROFILE\upload-keystore.jks `
  -storetype JKS -keyalg RSA -keysize 2048 -validity 10000 -alias upload
Create android/key.properties:
storePassword=your_store_password
keyPassword=your_key_password
keyAlias=upload
storeFile=../upload-keystore.jks
Build:
flutter build appbundle
# Output: build/app/outputs/bundle/release/app-release.aab
Build for iOS
Requires macOS with Xcode 14+ and an active Apple Developer account ($99/year).
Create Certificate Signing Request
Keychain Access → Certificate Assistant → Request a Certificate from a Certificate Authority → Save to disk.
Create iOS Distribution Certificate
Apple Developer portal → Certificates, IDs & Profiles → Create iOS Distribution certificate using your CSR file.
Open in Xcode
open ios/Runner.xcworkspace
Set Bundle Identifier, Version, Team, and Signing Certificate in target settings.
Build & Archive
flutter build ipa
Then: Xcode → Product → Archive → Distribute App → App Store Connect → Upload.
Delivery App Overview
A dedicated Flutter app for your delivery drivers (riders). Drivers log in with the account created for them in the admin panel, receive assigned orders in real time, navigate to the customer, and update the delivery status — all of which flows straight back into the admin Order Management and the customer's live tracking screen.
📦 Separate Flutter project
The delivery app ships as its own Flutter project (flutter-delivery-app). It shares the same toolchain, base-URL, app-name, package-name, and icon steps as the customer app — follow those same sections, just inside the delivery project folder.
Driver Login
Accounts created & assigned from the admin panel.
Real-Time Sync
Order assignments and status flow through the Laravel API.
GPS Navigation
Turn-by-turn directions to the customer address.
Delivery App Features
Everything a rider needs to complete deliveries efficiently — from accepting jobs to proof of delivery and tracking earnings.
Accept / Reject Orders
New assignments arrive with a push alert — accept or decline in one tap.
Live GPS Navigation
Turn-by-turn directions to pickup and drop-off with Google Maps.
Order Status Updates
Picked up → on the way → delivered, synced live to admin & customer.
Availability Toggle
Go online / offline so only available drivers get assignments.
Proof of Delivery
Capture a photo or signature to confirm handover.
Earnings & Payouts
Track completed deliveries, tips, and earnings by day or week.
Delivery History
Full log of past deliveries with addresses, amounts, and timing.
Contact Customer
Call or message the customer directly from the order screen.
Push Notifications
Instant alerts for new orders and assignment changes.
Installation & Setup
Get the delivery app running. Requirements are identical to the Customer App requirements.
Extract & Open Project
Open the delivery app project folder and install dependencies:
cd flutter-delivery-app
flutter pub get
Configure Base URL
Point the delivery app to the same Laravel API as the customer app — see the Base URL section below.
Create Driver Accounts
In the admin panel, create driver users and assign them the Delivery / Rider role. Drivers sign in to the app with those credentials to start receiving orders.
Run on Device / Emulator
flutter run
Then rebrand the app using the Base URL, App Name, Package Name, and App Icon sections below.
Base URL Setup
Connect the Flutter delivery app to your deployed Laravel API — use the same API domain as the customer app.
// flutter-delivery-app/lib/core/config/app_config.dart
static const String apiBaseUrl = String.fromEnvironment(
  'API_BASE_URL',
  defaultValue: 'https://your-domain.com/api',  // here replace your domain
);
Base URL must point to the admin api domain, not the web app domain. No trailing slash.
Change App Name
Give the delivery app its own display name (e.g. YourApp Driver) so it's distinct from the customer app.
1. Android
// android/app/src/main/AndroidManifest.xml
android:label="YourApp Driver"
2. iOS
// ios/Runner/Info.plist
<key>CFBundleName</key>
<string>YourApp Driver</string>
Change Package Name
The delivery app must use a different package id from the customer app so both can be installed and published side by side. A common convention is to append .driver.
// android/app/build.gradle
android {
  namespace = "com.yourcompany.yourapp.driver"
  defaultConfig {
    applicationId = "com.yourcompany.yourapp.driver"
  }
}
Global Find & Replace
Verify these files after replacement:
- android/app/build.gradle
- android/app/src/main/AndroidManifest.xml
- android/app/src/debug/AndroidManifest.xml
- android/app/src/main/java/ (or kotlin/)
flutter clean && flutter pub get && flutter run
Change App Icon
Use a distinct icon for the delivery app so drivers can tell it apart from the customer app on their home screen.
Generate all sizes with appicon.co — upload a 1024×1024 PNG and download all sizes.
flutter-delivery-app/assets/images/logo.png
flutter-delivery-app/assets/images/top_logo.png
flutter clean && flutter pub get
To generate all platform app icons, run this command
flutter pub run flutter_launcher_icons:main
Successfully generated launcher icons
flutter run
Build & Release
The delivery app builds exactly like the customer app. Run the commands below from inside the flutter-delivery-app folder, then follow the detailed Build for Android and Build for iOS steps for signing and store upload.
# Android APK / AAB
flutter build apk --release
flutter build appbundle --release

# iOS (macOS only)
flutter build ipa
Changelog
- ✓ Flutter customer app (Android + iOS)
- ✓ Flutter delivery / rider app (Android + iOS)
- ✓ Laravel 12 REST API backend
- ✓ Next.js 16 customer web app
- ✓ Admin dashboard with full order management
- ✓ Kitchen Display System (KDS)
- ✓ Table reservation management
- ✓ Real-time order tracking
- ✓ Push notification support
Update changelog on every release to keep buyers informed.